Articles

Jurassic Perennials

Jurassic Perennials Featured Image
The large leaves of Prairie dock (Silphium terebinthaceum) add a bold look to a native perennial planting.

Most garden perennials are bit players, chiming in with their month or two of bloom before fading from the scene. That’s why every perennial border can use a few plants that provide spring-to-fall presence. Among the best such plants are the giant-leaved perennials profiled below. Their lush, bold foliage provides ample interest and structure throughout the growing season, while the flowers of other plants flit by.

Large-Leaved Perennials For Shade

Big, Bold Hosta (Hosta spp.)

'Sum and Substance'
‘Sum and Substance’ is a classic large hosta for large shady borders.

Of course! Hostas are shade-garden favorites for several reasons. They’re incredibly tough and adaptable, tolerating drought and other forms of abuse (some will even do well in hot sunny niches). They offer showy and sometimes fragrant flowers (e.g., August lily, Hosta plantaginea) that peak during the summer months. But most of all, they produce broad leaves in a wide variety of colors, shapes, textures, and forms. Behemoths such as ‘Sum and Substance’ and ‘Empress Wu’ mature into 4-foot-tall, 6-foot-broad clumps of huge 2-foot-wide leaves. They’re the sort of thing you can build a whole border around.

Rodgersia (Rodgersia spp.)

Rodgersia aesculifolia in summer
Rodgersia aesculifolia has bold leaves and clusters of star-shaped pink flowers in summer.

Quite a few bold-leaved perennials are native to woodlands, where they use their ample foliage to maximize the capture of sparse sunlight. They’re also often partial to damp soil, to compensate for water lost from their leaves via evaporation. So it is with species of Rodgersia. Emerging late in spring, they unfurl large deeply lobed umbrellas that cover gaps left by flagging early spring perennials. The foliage of some Rodgersia varieties flushes in dramatic shades of burgundy and bronze before fading to green in summer. Flowering occurs in early summer in white or pink sprays reminiscent of their rose-family kin, the astilbes.

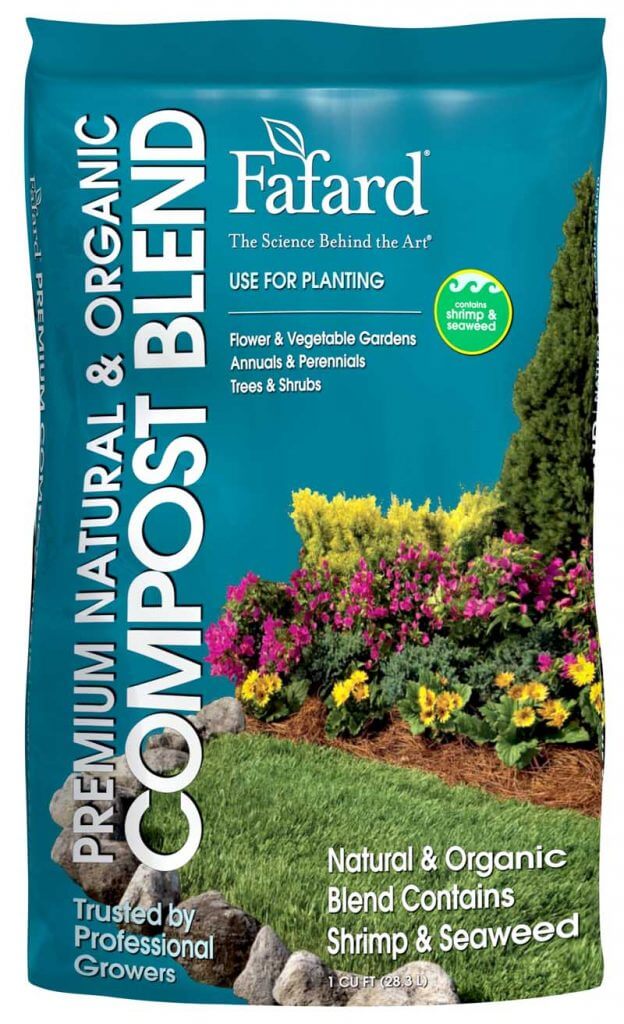
Give your rodgersia a moist, fertile, humus-rich soil, and it will wow you with massive clumps of jagged foliage. To get your soil up to snuff, add a generous amount of Fafard Premium Natural & Organic Compost. Astilboides tabularis – a close relative of Rodgersia – produces equally impressive clumps of rounded leaves, and favors similar conditions.

Umbrella Leaf (Darmera peltata)

Umbrella leaves
Umbrella leaf will add prehistoric looks to any shaded garden.

Also thriving in partial shade and rich moist soil is this Western U.S. native, Darmera peltata, which in favorable sites can grow to 5 feet tall and wide. The 18- to 24-inch-wide leaves arise in late spring on tall stems that attach to the leaf blades at their centers, parasol style. Rounded clusters of pale pink flowers appear on fuzzy stems in early spring, before the leaves break ground. Plants suffer in regions with hot humid summers such as the Southeast United States.

Shredded Umbrella Leaf (Syneilesis aconitifolia)

If you took a Darmera and cut its foliage into lacy segments, you’d have something like shredded umbrella leaf. The 18-inch-wide leaves form shaggy clumps that grow to 2 feet tall and wide. They’re perhaps at their most delightfully shaggy when pushing out of the soil in mid spring.  The fat silver-furred shoots look for all the world like miniature trolls emerging to possess the garden.

Japanese Butterbur (Petasites japonicus and hybrids)

Japanese butterbur
Japanese butterbur spreads, so plan to give it plenty of space.

Warning: this gargantuan perennial will smother everything in its reach under vigorously spreading clumps of 3-foot-wide leaves. It’s thus best placed in solitary confinement, such as in a driveway island bed. Curious, leafy, rounded clusters of shaggy whitish flowers precede the foliage in early spring, giving no hint of the magnitude of what’s to follow.

Golden Groundsel (Ligularia spp.)

Ligularia stenocephala
Ligularia stenocephala has beautiful large leaves and upright clusters of golden flowers.

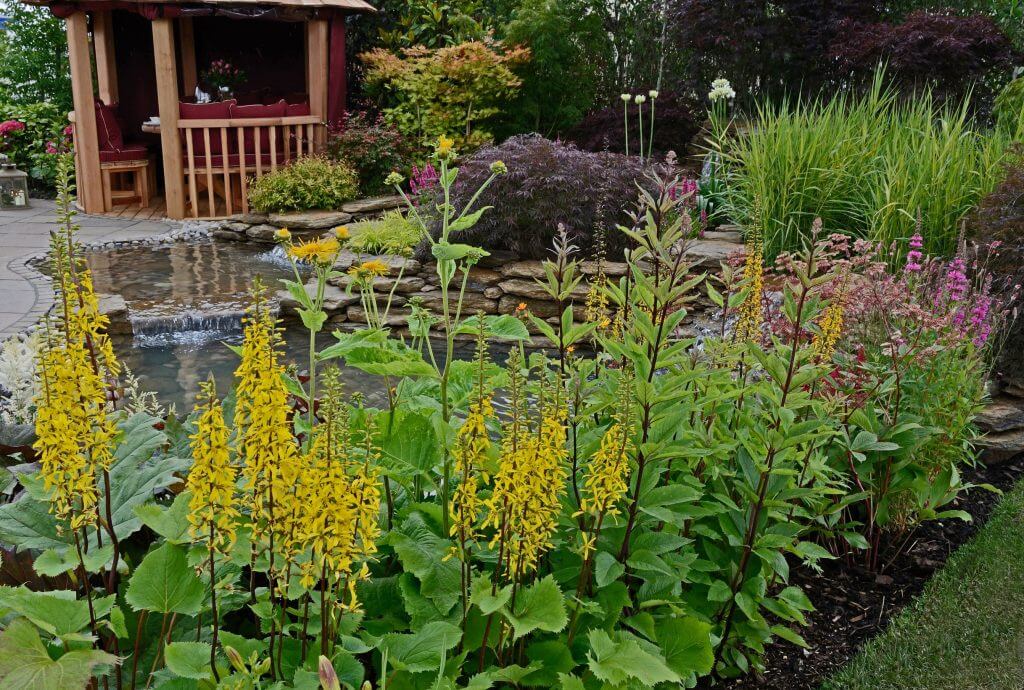
Got a soggy, semi-shaded area in your garden where a mega-leaved plant would look good? Ligularia would be perfect. Ligularia dentata produces expansive, long-stemmed, kidney-shaped leaves that are typically dark green but sometimes verge on black-maroon (as in the cultivar ‘Britt-Marie Crawford’). Large clusters of yellow daisy-flowers open above the 3-foot-tall, 4-foot-wide foliage clumps in midsummer. Other mesmerizing ligularias include L. stenocephala, with clumps of large arrow-shaped leaves topped by tall spires of yellow flowers in summer; and Ligularia japonica, whose rounded leaves are dissected into numerous narrow segments.

Large-Leaved Perennials For Sun

Chinese rhubarb (Rheum palmatum)

‘Atrosanguineum’ flowers (Image by M. Zell)
‘Atrosanguineum’ features rose-pink flowers and colorful leaves that flush maroon in spring before maturing to the usual rich-green. (Image by M. Zell)

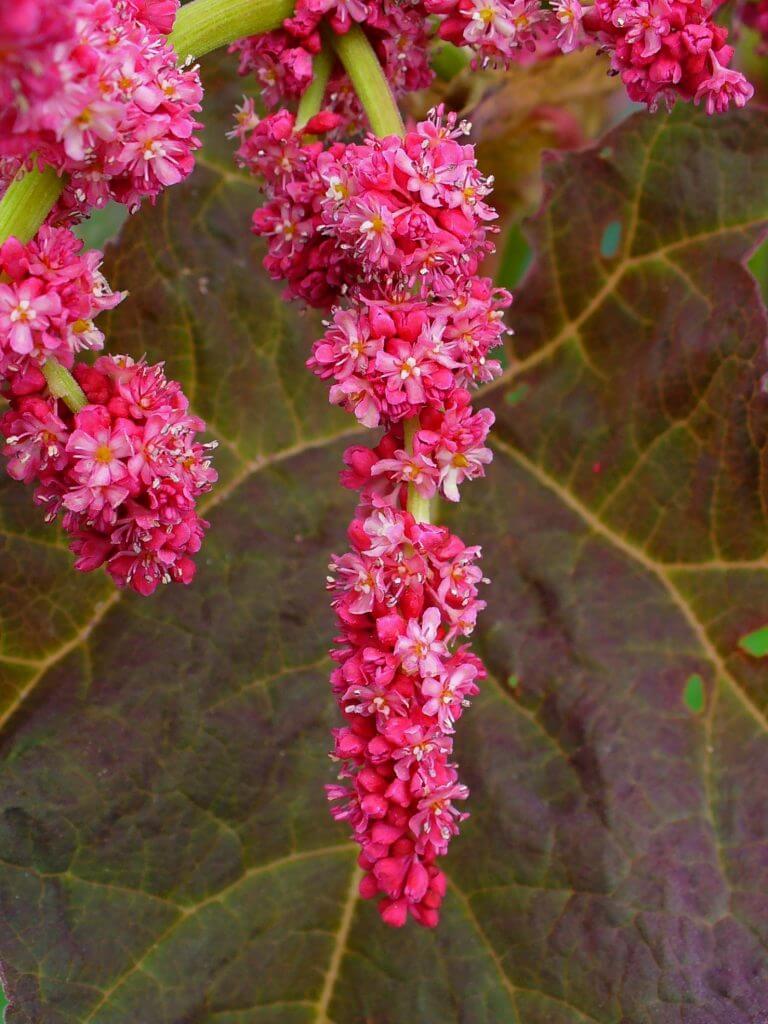
Fertile, moist, cool, humus-rich soil in full sun is ideal habitat for this leviathan – particularly where there’s lots of room for its rambling rhizomes. Lobed in maple fashion, the immense leaves measure as much as 3 feet wide. Equally gigantic are the towering plumy white flower clusters on 6- to 8-foot stems in late spring. Variety ‘Atrosanguineum’ features rose-pink flowers and colorful leaves that flush maroon in spring before maturing to the usual rich-green.

Prairie dock (Silphium terebinthaceum)

The upright, oval- to arrow-shaped, 2-foot long leaves of this massive perennial are a signature element of the American prairie. They also make quite the foliar statement in a sunny border. Yellow daisies on statuesque, 6- to 10-foot stems provide a statement of their own in late summer.

Glade mallow (Napaea dioica)

Glade mallow leaves
The large leaves of glade mallow are palm-shaped and attractive.

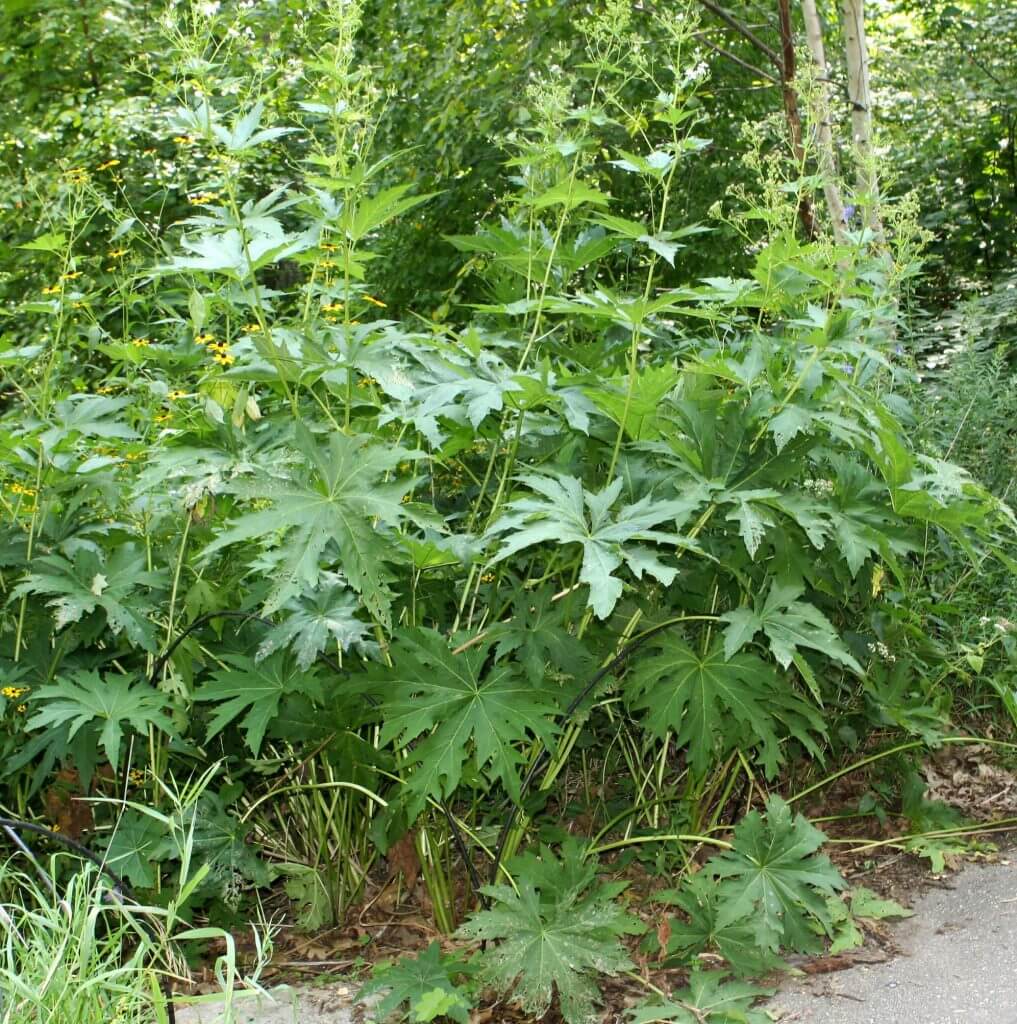
The neighbors may wonder whether you’re growing a particularly robust form of Cannabis sativa. They’ll wonder no longer in early summer when clusters of white flowers open on towering 5- to 7-foot stems. The lush clumps of lobed, foot-wide leaves that are the main reason for growing this midwestern native, however – preferably in moist, fertile, humus-rich soil in full to part sun.

Whether you have sun or shade, plant any one of these grandiose perennials as a bold garden statement. Space is required.

Growing Hops at Home

Growing Hops at Home Featured Image
Growing Hops at Home

If you’re into brewing your own beer, perhaps it’s time to start growing its components, too. Hops – the cone-like fruits that give most brews their signature flavors and aromas – are a cinch to cultivate if you have lots of vertical garden habitat such as a pergola or large trellis. A close relative of “weed” (it’s a member of the Cannabis family), hops (Humulus lupulus, USDA Hardiness Zones 5-10) is something of a weed itself, twining to 15 feet or more in spring and summer and dying back to a suckering perennial rootstock in winter. You’ll sometimes find it winding through the abandoned shrubbery of pre-revolutionary estates, a legacy of a time when home-grown and home-brewed beer was a way of life.

Hops Flowers

Hops flowers
Hops flowers are pale green and cone-like.

Hops are borne on female plants of Humulus lupulus – no male companion required. In fact, growers and brewers generally shun male plants, preferring the flavor of seedless hops. No nearby males mean no pollination and thus no seeds. Occasionally, female plants may produce conical sprays of small sterile flowers that appear to be male. These ersatz male flowers are pollenless.

Growing Hops

Hops flowers growing on a trellis
A strong, attractive trellis is a great support for growing hops at home.

Humulus lupulus plants flourish in full sun and fertile, moist, organic-rich soil. Dig a planting hole several times wider than the root ball, and amend the backfill with Fafard Organic Compost, as needed. If indicated, topdress your newly planted hops with a fertilizer relatively high in nitrogen and potassium and low in phosphorous (5-2-4 works well). Mulch with a couple inches of compost, and your hops are good to grow. Water frequently during late spring and early summer, when the hops vines (or “bines”, as they’re traditionally known) are growing most rampantly – as much as 9 inches per day. You can also propagate hops from seed, rogueing out male seedlings as they flower.

Hop Varieties

Golden hops
Golden hops is a common ornamental variety, but it is not a good choice for beer makers.

Numerous of hops varieties are available from specialty growers. (Click here for the hops list.) The fruits of each variety possess characteristic levels of acids and other compounds that determine the bitterness, aroma, and other qualities of the hops – and of your brew. All have comparable growth habits. The real differences are in the fruits. One variety – Humulus lupulus ‘Aureus’ – is grown for its ornamental yellow foliage rather than for its hops.

Across Eastern North America, Japanese hops (Humulus japonicus) has become a nasty invasive species with no beer-making value because the flowers lack the pleasing flavors favored for beer. One distinctive characteristic is that the leaves and stems are covered with scratchy spines. The female flowers are also very small. Pull these plants on sight because they terribly invasive vines can reach 35 feet in a season and cover beds and landscape areas quickly.

It’s best to purchase hops as container-grown plants propagated from disease-free stock. Hops were traditionally propagated from sections of root-like rhizomes, but rhizomes sometimes carry viruses and other diseases.

Harvesting Hops

Harvesting hops without gloves
Don’t make the mistake of harvesting hops without gloves.

Hops ripen in late summer – August or September in most of their USDA Zone 4 to 9 hardiness range. Plants may not bear well their first year or two. Harvest the hops when their outer scales begin to feel dry, papery, and slightly springy to the touch, and when their powdery coating (known as “lupulin”) turns yellow and sticky. You can either pluck the hops off the standing vines, or cut the plants back to 3 feet and harvest the hops from the cut vines. In either case, wear gloves and thick clothes to protect your skin from the bristly, irritating hairs that coat the plants.

Hops with a glass of beer
Hops can be used fresh or dried to flavor brews.

Either use the freshly harvested hops in your brew, or spread them out to dry on a screen or in a food dehydrator or 140 degree oven. Dried hops are ready to store when they’re papery and slightly brittle, and when their lupulin sheds readily from the scales. Bag and freeze the dried hops to use in future brews.

Vining Vegetables for Vertical Gardening

Vining Vegetables for Vertical Gardening Featured Image
Vining Vegetables for Vertical Gardening

Don’t have as much space for growing vegetables? Then maybe it’s time to go the way of Jack with his beanstalk. Numerous veggies are vines perfectly suited for training up a trellis, thereby taking advantage of upright, aerial space. Vertical veggies also hold their fruits clear of the ground, reducing their susceptibility to rot. Three-dimensional gardening offers multiple advantages.

There are a couple of common trellis types. Crosswise bamboo trellises fitted with trellis netting is an easy way to go. Twine strung between sturdy stakes or posts provides an excellent trellis for most vertical vegetables. Run a horizontal length of twine along one side of the plant row, then loop it back on the other side to secure the stems. Add a new tier of twine every 8 to 12 inches or so to keep pace with the vines. Alternatively, you can secure your climbers with twist ties or snippets of string. Some veggies help by self-attaching with “grasping” structures such as tendrils.

Fafard Garden Manure Blend pack

Orient the trellis rows north to south, so both sides get similar amounts of sun. If the soil needs more organic matter, till in a couple of inches of Fafard® Premium Natural & Organic compost or Garden Manure Blend before constructing the trellis and sowing seed.

I featured three climbing veggies – Malabar spinach, scarlet runner beans, and purple pole beans – in last month’s “Easy, Attractive Vegetables for Any Garden”. Now we’ll go further.

Pole Beans

Pole beans
These pole beans have each been given a pole to climb.

String or snap beans (Phaseolus vulgaris) are undoubtedly the aerial champions of the veggie tribe. The ever-popular snap (or string) bean comes in a variety of twining forms, including the purple-fruited varieties profiled in last month’s article. All are wonderful for threading through a twine trellis, or for growing up a teepee of tall stakes.  They include:

Broad romano beans
Broad romano beans are surprisingly tender. (Image by Jessie Keith)
  • Standard-issue green beans. Heirloom favorites ‘Blue Lake’ and ‘Kentucky Wonder’ both are available as climbers (many gardeners favor them over the bushy versions because they are more productive). More recent introductions include ‘Fortex’, featuring long slender pods that ripen relatively early, and somewhat shorter-podded ‘Malibu’.
  • Speckled beans. The tan, purple-streaked pods of the heat-tolerant variety ‘Rattlesnake’ are borne most prolifically in areas with long growing seasons, making it a great choice for Mid-Atlantic and Southeast gardens. Speckled varieties for cooler climates include ‘Cascade Giant’, a prolific producer of large beans that are similar in coloration to ‘Rattlesnake’.
  • Flat, Romano beans. Among the best romano varieties for cooler climates is ‘Northeaster’, with tender 7-inch beans that ripen some 55 days after sowing. For a later, longer harvest, try ‘Helda’, which produces tasty 9-inch pods for much of the summer.
  • Yellow wax beans. The 5-inch pods of ‘Grandma Nellies Yellow Mushroom’ have a wonderful rich complex flavor that really does have hints of chantarelle. Many of the best wax pole beans are also golden romano types. These include ‘Goldmarie’ and the Italian heirloom ‘Marvel of Venice’, which also has pinkish-purple flowers.
  • Shelling beans. Grown for their colorful and flavorful seeds that are shucked from the pods late in the season, these varieties are sometimes also excellent as snap beans. One such variety is the heirloom ‘Cherokee Trail of Tears’, whose tasty pods yield shiny black seeds if left on the vine. Another excellent multi-purpose American Indian heirloom variety is the white-seeded ‘Hidatsa Shield Figure’, named for the seeds’ oblong tan markings.
Yellow wax beans
Yellow wax beans have a milder bean flavor.

Lima beans or butter beans (Phaseolus lunatus) are grown for their broad, flattened, buttery seeds, lima beans are a much more diverse tribe than the frozen food section of your local supermarket might lead you to believe. The heirloom ‘Willow Leaf’ bears small, meltingly succulent, greenish-white limas, borne on disease-resistant vines furnished with distinctive narrow foliage.  A favorite of Thomas Jefferson, ‘Sieva’ also produces small whitish scrumptious limas, but on high-climbing vines with broad leaves. Some Phaseolus lunatus varieties are brightly colored, as is the case with the heirloom ‘Christmas’. It yields large, white, heavily red-splotched limas on tall disease- and heat-resistant vines.

'Red Noodle' beans
Yardlong beans like ‘Red Noodle’ produce for longer than average beans and thrive in heat!

Yardlong beans (Vigna unguiculata) are East Asian legumes grown for their remarkably long slender beans that ripen all summer on tall, vigorous, exceptionally heat-tolerant vines. Look for ‘Chinese Red Noodle’, with deep red, 18-inch beans; ‘Chinese Mosaic’, with pale purple pods; and ‘Taiwan Black’, which produces 40-inch-long fruits studded with black seeds.

Other Vigna unguiculata varieties are grown expressly for their seeds, commonly called cowpeas, rather than their pods. Many of these varieties also grow as vines, including ‘Whippoorwill White’, ‘Blue Goose’, and another Thomas Jefferson favorite, ‘California Blackeye’. All varieties of the species do best in areas with hot summers and long growing seasons.

Peas

Golden snow peas
These tall golden snowpeas are perfect for upright growing. (Image by Jessie Keith)

Many shelling, snap, or snow pea (Pisum sativus) varieties produce long stems furnished with clasping tendrils to hold them upright. They grow best in spring, fall, or areas with cooler summers, so keep this in mind before planting them. The tallest varieties such as ‘Tall Telephone Pole’ will top out at 6 feet or more. Some peas grow as low bushy plants, so be sure to check before purchasing. (Click here to learn more about growing peas.)

Tomatoes

A couple tending tomatoes in the garden
Vining indeterminate tomatoes are easily drained up a trellis.

Tomatoes (Solanum lysopersicum) are often described as growing “on the vine”, and many of them do exhibit clambering, vine-like growth. Yet relatively few gardeners treat them that way. To trellis your tomatoes, start with an “indeterminate” variety – the term for types that keep lengthening their stems rather than growing to a certain height and stopping. Train the plant’s main stem up a sturdy twine trellis as described above, pinching out any side suckers that appear. Rampant varieties such as ‘Yellow Oxheart’, ‘Black Cherry’, and ‘Climbing Triple Crop’ will ascend to 10 feet or more. You can also allow your tomato vines to double back down the trellis once they’ve reached the top. Avoid determinate varieties, which will resolutely not climb. (Click here to learn more about growing cherry tomatoes.)

Cucumbers

Gardener working on cucumber vines
Strong trellis netting will easily support trained cucumber vines.

Cukes (Curcumis sativus) are natural-born climbers, equipped with curlicue tendrils that cling to whatever structure they’re scaling. Consequently, they’re a natural choice for training up a sturdy trellis or fence. Less weighty types such as pickling cukes are often the best choice. A few varieties such as ‘Japanese Climbing’ have been bred expressly to grow as vines. Of course, you’ll want to avoid bush cucumbers, which are bred not to climb. The small-fruited, heat-tolerant Beit-Alpha type cucumbers are also recommended. The easy, crisp, and delicious ‘Diva‘ is a good one to start with. (Click here to learn more about growing cucumbers.)

Melons

Melons on study trellis
Melons are easily trained vertically, but their heavy fruits need to be trussed and supported.

Cantaloupes (Curcumis melo), watermelons (Citrullus lanatus), and many other melons have vining habits and work well as climbers. The average cantaloupe or small-fruited watermelon (such as ‘Sugar Baby’) will require something much sturdier than a stake-and-twine trellis. Four-by-four posts and heavy-gauge wire are more like it. (Click here to learn more about growing melons.)

Gourds

Gourds on a makeshift pergola
Gourds can be grown on a trellis or makeshift pergola.

Bottle and swan gourds (Lagenaria siceraria), luffa (Luffa aegyptiaca), and a number of other gourd species grow on rampant vines that benefit from the support of a sturdy trellis or other structure. With their fanciful shapes and colors, gourds are a kick to grow, and kids of all ages love them. Favorites include ‘Bird House‘, ‘Big Apple’, ‘Bushel Basket’, and Luffa for homegrown skincare.

Happy climbing!

Climbing Roses for Garden Romance

Climbing Roses for Garden Romance Featured Image

For garden romance, nothing surpasses a climbing rose cascading over an arbor, its arching canes laden with a torrent of voluptuous blooms.

Sadly, many climbing rose varieties do not live up to this promise. They are – after all – roses, which are rightfully notorious for their susceptibility to pests and diseases. Arching canes dripping with roses aren’t nearly as romantic when they’re also dripping with fungal spores and sawfly larvae.

On the other hand, a few climbing roses (including those profiled below) literally and figuratively rise above the frailties that dog so many of their kin. Give them ample sun and fertile, moist, humus-rich soil, and they’ll give you years of virtually problem-free beauty (and romance). You’ll also want to give them a yearly pruning, removing old woody canes at the base in early spring or after flowering (for non-repeaters).

Resilient, Reliable Climbing Roses

A John Cabot rose climbing an arbor in a backyard garden.
A John Cabot rose climbing an arbor in a back yard garden.

‘John Cabot’ – 8- to 10-foot canes produce quantities of large, deep pink, double roses in late spring. Stiff and upright in growth, this wickedly thorny cultivar works best when bound to a somewhat out-of-the-way structure such as a trellis. As with many of the hardiest, most disease-resistant roses for American gardens, ‘John Cabot’ is a hybrid of the bomb-proof species Rosa kordesii.  It’s also one of several hardy, rugged, and beautiful climbers developed in Canada as part of the Explorers Series of roses. Temperatures of minus 20 F (USDA Hardiness Zone 4) are no problem for this cultivar.

‘William Baffin’ – Another outstanding Explorer Series rose with Rosa kordesii genes, this tireless bloomer produces a late-spring-to-frost succession of large, strawberry-pink, semi-double roses with prominent yellow stamens. The arching, 8- to 10-foot, glossy-leaved canes are good for training to a structure, but ‘William Baffin’ also works well as a large freestanding shrub. This exceptionally hardy Explorer rose overwinters with no protection to USDA Zone 3.

Pink roses climbing on white fence embody old-fashioned garden beauty
Pink roses climbing on white fence embody old-fashioned garden beauty.

Awakening’ – The ubiquitous climbing rose ‘New Dawn’ gave rise to this superior sport. The large, fragrant, soft-pink blooms are fully double, to the point of being “quartered” in old-rose style. They’re borne almost continually from late spring to frost on towering, 10- to 14-foot canes. Lush, glossy, disease-resistant foliage and USDA Zone 5 hardiness add further to its value.

Dortmund’ – The relatively flexible canes of ‘Dortmund’ are ideal for training horizontally along a fence or wall, where they make quite the show when bedecked with bright red, white-eyed, single blooms.  Flowering peaks in late spring and early summer, but regular deadheading will encourage additional rounds of bloom later in the season. Showy orange rose hips follow the flowers if they’re not removed.  Another Kordesii hybrid (but not an Explorer), ‘Dortmund’ is exceptionally hardy, to USDA Zone 4.

‘Climbing Pinkie’ – Speaking of flexible roses, this Polyantha hybrid will weave through a trellis, trail down an embankment, or do any number of other useful things that are beyond the capabilities of stiffer cultivars. It’s also virtually thornless, which means you can fearlessly move in close to enjoy its fragrant clusters of small double pink roses. Flowering peaks in late spring with little or no repeat, and hardiness is moderate (USDA Zone 6).

A 'Zephirine Drouhin' (Image thanks to Jackson & Perkins)
A ‘Zephirine Drouhin’ is beautifully trained against a home. (Image thanks to Jackson & Perkins)

‘Royal Sunset’ – Disease-resistant climbers also come in classic hybrid-tea style, with pointed buds opening to rounded, fully double, fragrant blooms. Introduced in 1960, when hybrid teas were all the rage, ‘Royal Sunset’ bears masses of apricot-pink roses in late spring on tall, 8- to 14-foot canes. Lesser flushes of bloom repeat later in the season. Like most hybrid teas, ‘Royal Sunset’ has only moderate winter-hardiness, to USDA Zone 6.

‘Zephirine Drouhin’ – If you really want to dial up the romance, plant ‘Zephirine Drouhin’, a nineteenth-century heirloom variety with intensely fragrant double pink roses from spring until frost. Nearly thornless, it makes the perfect subject for a bench-side bower or other intimate garden feature. Although not quite as hardy and pest resistant as the Kordesii hybrids, ‘Zepherine’ is still remarkably adaptable, tolerating semi-shade and wintering well into USDA Zone 5.

Yellow and red climbing roses
Yellow and red climbing roses mingle together along a stone wall.

Spring is a great time to plant the climbing rose of your dreams. Just dig an ample planting hole (3 feet wide or more), amend the backfill with Fafard® Premium Natural & Organic Compost, water every few rainless days while your rose establishes, and let the romance begin. (Click here to learn more about how to properly plant shrubs.)

Favorite Fragrant Early Spring Flowering Shrubs

Favorite Fragrant Early Spring Flowering Shrubs Featured Image

Some shrubs produce flowers that do more than draw the eye; they also delight us with their delicious scent. The most obvious examples are hybrid tea roses and common lilac (Syringa vulgaris), which owe a good deal of their renown to the legendary bouquet of their blooms. Yet many other shrubs offer equally alluring fragrance, often at seasons when lilac and rose are at a lull.  Here’s a seasonal summary of a few of the best.

Asian Witch Hazels

The orange-red Hamamelis x intermedia 'Jelena'
The orange-red Hamamelis x intermedia ‘Jelena’ is a reliable late-winter bloomer.

Asian witch hazels (Hamamelis x intermedia and H. mollis) – The ribbon-like yellow, orange, or red petals of these large shrubs unfurl on mild days in late winter (this year, they started blooming in mid-January here in balmy Rhode Island). Plant Asian witch hazels to the south of paths, doorways, and other winter viewpoints, where their gossamer petals will glow against the slanting rays of the winter sun, and where mild southern breezes will waft the flowers’ lemony scent to passersby. Witch hazels offer a bright encore in fall, their leaves assuming sunset tones that distantly echo the hues of their winter flowers. Hardy from USDA Zones 5b to 9, they succeed in full to partial sun and in just about any soil that’s not soggy or parched.

Winter Honeysuckle

Winter honeysuckle blooms
Winter honeysuckle blooms are delicate, white, and highly fragrant.

Winter honeysuckle (Lonicera fragrantissima) – A welcome sight and scent in the late winter garden, this East Asian native perfumes the air with small, white, funneled blooms that open on mild days from January to early April. A deciduous, 6-foot shrub in the colder sectors of its zone 5 to 9 hardiness range, it behaves – or rather misbehaves – as a moderately to highly invasive 8- to 12-foot evergreen in the Mid-Atlantic and Southeast. It’s thus best reserved for northern U.S. gardens. Its hybrid Lonicera × purpusii (including ‘Winter Beauty’) does much the same thing. All forms of winter honeysuckle favor full to partial sun and well-drained, average to fertile soil.

February Daphne

February Daphne blooms
The flowers of February daphne bloom before the branches leaf out.

February daphne (Daphne mezereum) – Intensely fragrant mauve-pink flowers crowd the naked, erect branches of this sparse, 3- to 4-foot shrub in late winter and early spring – a bit later than its common name would suggest. White-flowered cultivars are also available. Poisonous red fruits follow the flowers, and sometimes give rise to volunteer seedlings. A long-time garden favorite in its native Eurasia as well as in the U.S. and Canada (where it’s hardy from zones 4 to 7), it does best with plenty of elbow room, humusy well-drained soil, and full to partial sun. Give it a late-spring top-dressing of Fafard® Premium Topsoil to keep its roots cool, healthy, and happy.

Spring-Flowering Viburnums

The classic Korean spice viburnum
The classic Korean spice viburnum has clusters of powerfully sweet-scented spring flowers.

Korean spice viburnum (Viburnum carlesii) – The searching clove-like fragrance of Korean spice viburnum’s tubular, pinkish-white blooms is a welcome and warming presence in the mid-spring garden. The domed flower clusters typically open around the first of May in USDA Zones 5 and 6. Korean spice’s hybrid Judd viburnum (Viburnum x juddii) offers similar flowers and grayer, less aphid-prone leaves, in a similar, 6- to 8-foot package. The flowers of fragrant snowball (Viburnum x carlcephalum), another carlesii hybrid, are waxier and of heavier substance, and occur in larger, denser, almost spherical clusters. For tighter spaces there’s Viburnum carlesii ‘Compactum’, which matures at about 3 feet. Most forms and hybrids of Korean spice viburnum prosper in full sun from zones 5 to 8, and turn smoky burgundy tones in fall. Fragrant snowball is slightly less hardy, to zone 6.

Korean Abelia

Korean abelia
Korean abelia can be purchased at specialty nurseries and blooms in mid to late spring.

Korean abelia (Abelia mosanensis, aka Zabelia tyaihyonii) — An unassuming shrub most of the year, Korean abelia grabs sensory center stage in mid-spring when it envelops its branches in funnel-shaped pink flowers. The swarms of beguilingly spicy blooms draw every butterfly (and human) within sniffing distance.  The flowers also attract hummingbirds, desipite the fact that these birds have little to no sense of smell. This 4- to 6-foot shrub makes a great choice for full sun and average to fertile soil in zones 5 to 9.

Caucasian Daphne

Caucasian Daphne
Caucasian daphne is an evergreen shrub and late-spring bloomer.

Caucasian daphne (Daphne x transatlantica) — Late spring is also when this little love begins its lengthy bloom season. Wafting a complex and seductive fragrance containing hints of clove and vanilla, the glistening white flowers flush first in May and June, repeating the performance multiple times throughout summer and early fall. No other shrub in the 3-foot range can surpass it for flower power and scent. The variegated cultivar ‘Summer Ice’ compliments the blooms with white-edged leaves. All forms of Caucasian daphne are ideally suited for planting near paths and patios and other areas where their flowers and scent can cast their spell. Full to part sun and humus-rich, well-drained soil is ideal, as is a niche protected from harsh winter wind and crushing snow loads. Plants are hardy from zone 5 to 8.

Summersweet

The pink-flowered Clethra alnifolia 'Ruby Spice' flowers
The pink-flowered Clethra alnifolia ‘Ruby Spice’ flowers in early to mid-summer.

Summersweet (Clethra alnifolia) joins the fragrance fest in early summer. Its candles of fuzzy white or pink flowers carry a distinctive (and irresistible) scent with root beer undertones. The finely toothed, insect- (and deer-) resistant leaves of this rock-hardy eastern North American native are a lustrous dark green, turning brilliant butter-yellow in fall. Compact cultivars of summersweet (such as ‘Hummingbird’ and ‘Sixteen Candles’) make splendid shrubby ground covers for sun or shade, suckering to eventually cover considerable territory. Full-size, 6- foot varieties such as pink-flowered ‘Ruby Spice’ are among the premier shrubs for the summer garden. All forms do best in moist, humus-rich soil in zones 4 to 8.

Swamp Azalea

Swamp azalea
Swamp azalea grows well in average to moist garden soils with a more acid pH.

Swamp azalea (Rhododendron viscosum) is another summer-blooming native shrub with a wonderful scent (which hints at cloves rather than root beer). It, too, loves moist soil, making it an obvious garden companion for summersweet. Also well worth planting within its zone 5 to 8 hardiness range are several swamp azalea hybrids such as pale-yellow-flowered ‘Lemon Drop’.

Glory-Bower

Glory-bower flowers
The late-summer flowers of glory-bower are attractive and emit a fine scent.

Glory-bower (Clerodendrom trichotomum) — For late-season fragrance there’s this large suckering shrub (which reaches arboreal stature in warmer parts of its zone 6 to 9 hardiness range). The starry pale pink flowers begin in August and continue for many weeks, eventually giving way to blue-black berries nested within showy maroon calyces. This rather rambunctious East Asian native is not for small spaces or for locations where it might invade nearby natural areas (especially in the southern portions of its zone 6 to 9 hardiness range). It tolerates some shade, but prefers full sun.

How to Plant and Site Trees and Shrubs

How to Plant and Site Trees and Shrubs Featured Image

The key to successful gardening is to go (and grow) with what you’ve got. If your garden has acid soil and lots of shade, go with acid- and shade-loving plants. If sunny, dry, alkaline conditions dominate, then plan and plant accordingly. This also holds true for the garden’s aesthetic. For example, more “naturalistic” settings (such as a woodland edge) call for more informal, nature-evoking plantings. Beautiful and bountiful things happen when a garden is in harmony with its surroundings.

Understand Your Garden’s Site

Light, soil, space, garden-style, and other parameters must be considered before planting a new tree or shrub.

It’s especially important to keep this in mind when choosing – and planting – the trees and shrubs that will form the framework of your garden.  Choose the right plants and get them off to a good start, and good things are almost sure to follow.

Fafard Premium Topsoil pack

It all comes back to knowing the site’s conditions. What are the pH, nutrient-holding capacity, and other characteristics of your soil? If in doubt, you can get a definitive answer by sending soil samples to your state’s horticultural extension service (click here for a nationwide list of extension services). What is the site’s exposure to sun, wind, and water (e.g., rain and runoff)? How and when do you use your yard? Now, during the dormant season, it is a great time to assess these factors. Then, based on your site’s particulars and your preferences, compile lists of trees and shrubs that are a good fit.

Planting Trees and Shrubs

Creating a broad planting hole
A suitably broad planting hole should be around three times as wide as the plant’s root ball.

When you get around to planting, the same precepts remain. Trying to force an ill-chosen plant into an incompatible site is a losing prospect. If the tree or shrub is a good fit, all it needs is a good root system and a suitably broad planting hole, backfilled (to the proper depth) with unamended or lightly amended soil for best establishment. Of course, planting at the proper season and providing regular post-planting care (especially watering) are also essential.

Sizing Up the Planting Hole

Adding a light application of soil amendment
Adding a light application of soil amendment, such as Fafard Premium Topsoil, will give the soil extra organic matter.

Planting width requires a “suitably broad” planting hole is at least three times as wide as the plant’s root ball, although twice as wide will do in a pinch. The texture of the excavated and refilled soil differs significantly from that of the surrounding undisturbed soil; consequently, it also differs significantly in other properties such as moistness and aeration. Adding a light application of soil amendment, such as Fafard Premium Topsoil, will give the soil additional organic matter for increased water-holding ability to help the establishing plant. This is of greatest importance in poor or sandy soils. If your soil is of good to average quality, this step is not needed. A wide planting hole gives the roots a relatively homogeneous environment in which to extend and establish. By the time they’ve reached the edge of the former planting hole, they’ll be more up to the job of worming their way into the undisturbed soil. Additionally, the refilled soil will settle over time to a texture closer to that of the surrounding soil, thereby easing the roots’ transition.

New tree in a dug out planting hole
The planting hole should be no deeper than the root ball.

Planting depth – unlike width – can be overdone. In fact, the planting hole should be no deeper than the root ball. Most of a tree’s or shrub’s feeder roots are within a few inches of the surface. A deeper hole serves only to loosen the texture of the soil below the root ball, increasing the likelihood that it will settle and pull the roots down with it. Plants generally do not thrive in air-starved sinkholes.

Pressing down soil around the plant
Work soil in around the plant and press it down to remove any unwanted air pockets.

Shallower planting may be required in heavy clay soil. Planting holes in such soils are subject to the bathtub effect, with water percolating through the relatively coarse refill soil and pooling at the bottom of the hole. Here, dig an extra-wide hole that’s significantly shallower than the root ball, sloping the base of the hole toward its edges. Mix the excess backfill with Fafard® Premium Topsoil, and mound this over the exposed root ball after planting.

Sizing Up the Tree or Shrub

Pot-bound plant roots
Make sure plant roots have not become pot-bound. If they have, work them apart to help them grow into the soil.

Potted trees and shrubs with vigorous, relatively undisturbed roots make the best planting material. Avoid pot-bound plants whose roots have long ago filled or grown beyond their containers. Before buying a containerized plant, try to knock it out of the container to check the root system. If the root ball remains stubbornly wedged in its container even when you apply force to remove it, it’s a risky prospect. Ideally, the roots should not circle the soil ball, and abundant white feeder roots should be evident at its edge. You can plant container-grown trees and shrubs just about any time the ground is workable, but be sure to keep the root ball from drying out after planting. Most potting soils are peat-moss based, making them coarser and more drought-sensitive than the surrounding soil. They also resist re-moistening once completely dry. Newly planted container-grown plants may need watering several times a week during summer droughts.

Plants in containers and heavy clay
Unlike container-grown plants, B&B plants are often grown in heavy clay, which cracks and resists water when dry.

Bare-root and balled-and-burlapped (B&B) trees and shrubs lose much of their root systems when harvested at the nursery. They thus require more kid-glove treatment. Plant them either in early spring or in late summer/early fall to give their roots ample time to regrow before summer heat or winter cold arrive. Be sure that their roots do not dry out before planting. Unlike container-grown plants, B&B plants are often grown in heavy clay, which cracks and resists water when dry.

Be careful to plant bare-root and B&B shrubs and trees at the proper depth. For bare-root plants, partially refill the planting hole with a volcano-shaped cone of soil, spreading the roots atop the cone before backfilling. The plant’s trunk/root junction (also known as the “root flare”) should be just at or slightly above the soil surface. Stems of B&B trees and shrubs are often partly buried in their root ball; if so, remove some of the soil to expose the root flare. Also, be sure to minimize disturbance to B&B root balls as you plant, and remember to unswaddle the burlap (or wire caging) from the top and sides of the root ball before refilling the hole. Either cut and discard the unwanted wrap or pull it back and bury it at the bottom of the hole.

Adding mulch layer to newly planted tree
A two- to three-inch mulch layer will hold in soil moisture and protect against weeds.

Add a good mulch layer to buffer newly planted trees and shrubs from drought, heat, and cold, apply an inch of Fafard® organic compost and a couple of inches of bark mulch to the planting area. They’ll appreciate the extra pampering, and you’ll appreciate the results!

Beautiful Indoor Begonias

Begonia maculata ‘Wightii’ has spectacular spotted, elongated leaves.

Begonias are so much more than summer bedding plants. This dizzyingly diverse genus encompasses more than 900 tropical and temperate species and 10,000 cultivars – most of which are not Semperflorens hybrids (the botanical name for the ubiquitous wax begonia). Growing in a wide range of forms and habits – from elfin perennials to cascading vines to large shrubs – they offer a myriad of possibilities for garden and greenhouse.
They also offer something for every season. Winter, especially, is a great time to have some begonias around the house – including those types that bear splashy evergreen leaves in a range of fanciful shapes and colors.

Cane Begonias

The cane begonia, Begonia aconitifolia, looks beautiful even when not in bloom.

Cane begonias, for example, are a group of shrubby species and cultivars distinguished by their thick, fleshy, bamboo-like stems and typically large, flamboyantly marked leaves, often of “angel-wing” shape.

Numerous cane varieties are available, including Begonia maculata ‘Wightii’, whose elongated, olive-green “angel wings” are decorated with silvery-white dots and maroon undersides and clusters of white flowers hover over the foliage in summer; Begonia aconitifolia ‘Metallica, named for its shimmering deep green, purple-veined, hand-shaped leaves with red-purple reverses. Pink-flushed white flowers appear in fall; and Begonia ‘Cracklin’ Rosie, with pleated, shiny, dark olive-green, pink-dotted leaves with maroon undersides. New leaves are suffused with copper.

Rex Begonias

Rex begonia ‘Fireworks’ has silver-washed leaves with black-purple veins and purple margin. Grow them in indoor pots or a summer garden. (Image thanks to Terra Nova)

Also noted for their flashy leaves are the prima donnas of the tribe, the Rex hybrids, which trace their lineage to the begonia species of that name (it arrived in Europe from Northeast India in the mid-nineteenth century). Most Rex begonias have heart-shaped leaves with brash silver splashings and unequal lobes that sometimes spiral at the base. Rather fussy in cultivation, they require high humidity and porous soil kept neither too wet nor too dry. Cultivars include ‘Raspberry Swirl’, with relatively jagged, red-purple, silver-edged leaves; and the award-winning, Rex-like Begonia ‘Fireworks’, which is distinguished by its crisp, silver-washed leaves with black-purple veins and purple margins.

Numerous other begonias make great winter foliage plants. Among the many possibilities are ‘Caravan’, an easy-care, shrubby cultivar thickly clad with lime-green-veined, chocolate-suffused leaves that bring elephant ear (Colocasia) to mind; ‘Connee Boswell’, whose deeply lobed, maple-shaped, heavily silvered leaves have dark green, purple-flushed veins and rims; and ‘Madame Queen’, unique for its heavily ruffled, olive-green, red-backed leaves that have the look of an ornamental kale.

Brazilian Heart Begonia

The cascading stems of the easy-to-grow Begonia solananthera are frothed with fragrant, white, sometimes pink-tinged flowers. (Image thanks to Logee’s)

Perhaps most desirable for winter display are the begonias that go one better by flowering during this season. The cascading stems of the easy-to-grow Begonia solananthera are frothed with fragrant, white, sometimes pink-tinged flowers from early winter into spring. Fleshy, lettuce-green, heart-shaped leaves provide a year-round display. The B. solananthera hybrid ‘Potpourri’ one-ups its parent by producing rosy-pink blooms over an even longer season, sometimes flowering into early summer. A few cane begonias add to their value by blooming on and off throughout the year (‘Paper Snowflake’ is among the best, with silver-flecked angel-wing leaves and heads of deep pink blooms). And some wax begonias excel not only for summer bedding but also as year-round, ever-blooming pot plants. For bright, easy, four-season color, few house plants can match the endless succession of salmon-red blooms brought forth by the Semperflorens hybrid ‘Cotton Candy’.

Rex begonias
Vibrant leaf colors are the mark of many Rex begonias. (photo by Maureen Gilmer)

Most indoor begonias thrive in a warm eastern exposure or other brightly lit but not overly sunny location. They also often benefit from relatively high humidity (which can sometimes be provided by placing the pot on gravel in a saucer half-filled with water). An airy, humus-rich, soil-free potting mix high in peat (such as Fafard Professional Potting Mix with RESiLIENCE) works best. Water when the soil surface is dry, either from the top or by immersing the base of the pot in water. Then stop by the windowsill now and then to enjoy the winter show!

Begonia 'Irene Nuss' (Superba Group)
There are so many begonias to choose from for indoor color, such as this Begonia ‘Irene Nuss’ (Superba Group). (photo by Jessie Keith)

How to Map and Plan a New Garden

How to Map and Plan a New Garden Featured Image

The cusp of the New Year is not prime gardening season in much of the United States. But, it’s often an excellent time to map and design a new garden or planting border, even in areas that experience real winter. All that is required are bare ground, a relatively mild day, and a few common household items.

Start by considering the garden’s location, size, shape, and desired plants and their growing needs. Roughly sketch out your basic plans. At this stage, don’t worry about precision or specifics. The finer details will be worked out later.

Setting the Garden Perimeter

Measuring tape in grass
A 50- to 100-foot tape measure with a tip that you can stake in place is extra-useful.

Once you have sketched basic garden perimeter designs on paper, grab a couple of tape measures and a notepad and pen (or smartphone) and head out to the new garden site. A 50- to 100-foot tape measure with a tip that you can stake in place is extra-useful. If necessary, also bring a garden hose to mark portions of the prospective border’s perimeter that aren’t already defined by paths, walls, and the like. Place stakes along any hose-defined edges so that you’ll have something to refer to after you return the hose to its winter quarters.

Page on landscape architecture
Curved garden edges have a freer feel but are more difficult to edge and map. Rectilinear bed edges look more formal and are easier to edge and map. (Image from Residential Landscape Architecture)

A border with at least one long, straight edge is a cinch to map. At regular intervals (5 feet usually works well), measure the perpendicular distance from the straight edge to the opposite side of the border. Also, measure the distances to any extant plants and features that will remain as part of the new garden. Transcribe the data to graph paper and – voila! – you have an accurate map of your soon-to-be-border.

A border with curving edges is somewhat trickier to map. In this case, extend the tape along the approximate “equator” of the border, and measure the perpendicular distances from the tape to both edges at regular intervals. Compared to the straight-sided border, a few more dots and a bit more freehand sketching are required to translate these measurements to graph paper.

Mapping the Garden

Designing a garden
After taking measurements, put your design to paper.

A landscape design template is an especially handy implement for the drawing and mapping stage. You can purchase one (as well as graph paper) from most art- and drafting-supply stores, as well as online. It also helps if you have an image of your home’s footprint and yard to sketch upon and include for perspective. This will also help ensure that your garden is placed within your yard’s boundaries.

Illustrated plant renderings
Plant renderings can be illustrated in many different ways. Have fun. Be creative.
(Image from Residential Landscape Architecture)

To map the border’s location relative to the house, measure the length of the nearest side of the house, and the distances from its corners to the ends of the border. Using graph paper and a ruler, compass, or landscape design template, lightly sketch a curve representing the distance from the one corner of the house to one end of the border. Repeat for the distance from the other corner of the house. The intersection of these curves pinpoints the end of the border. This technique also works if you’d like to map the border’s relationship to other landscape features such as property lines.

Choosing Plants for the Garden

Choosing plants for the garden
Choose colorful, attractive plants that meet the site’s requirements and your aesthetic goals.

Next comes the really fun part – choosing plants. Given the border’s conditions and surroundings, what would grow and look well there? Compile a list of candidate garden plants that would provide a pleasing mix of flowers, foliage, shapes, sizes, and textures. When you’re happy with your list, start to play around on paper, beginning with the major “keystone” perennials, shrubs, or trees that will form the backbone of the new planting. A composition of rhythmically spaced “keystone” specimens – interspersed with clumps of smaller companion plants – generally works well. Lightly pencil-in a circle for each plant, spacing the circles according to plant size and vigor. Use a complete circle to represent individual specimen plants (often trees or shrubs), and fused circles (omitting their inner portions) to depict clumps.

De-sodding the garden beds
Once the soil warms, start cutting and de-sodding your beds.

Once you have a good handle on the design of your new border, you can start planning how to execute it. It’s never too early to start sourcing and ordering plants (especially rarities that are likely to sell out early). You also need to consider how you’re going to prepare the border site. Is the site currently occupied by grass or by other plants that will need removing? Now’s the time to formulate a strategy.

Fafard Premium Natural & Organic Compost Blend pack

Perhaps you’ll decide to rent a sod cutter come spring to remove turf from the site. Or maybe sheet composting is the way you’d like to go. Solarization – blanketing the site with heavy plastic to fry the existing vegetation as well as the weed seeds that lurk in the soil – is another excellent approach that works particularly well if you plan to hold off on planting until fall. A soil test might also be in order, whenever as the ground is workable (most state extension offices offer soil testing at a reasonable price). Finally, what’s your mulch of choice going to be? Now’s the time to find a source.

Whatever strategy you choose, you’ll likely need compost and soil amendments to improve the soil. If so, you’ve come to the right place! Fafard offers a bevy of such products, including Fafard Premium Natural & Organic Compost Blend and Fafard Premium Topsoil.

Happy planning – and planting – in 2020!

Garden Journaling: How To Plan Your Dream Garden

Garden Journaling: How to Plan Your Dream Garden Featured Image

A journal is one of the best tools for achieving the garden of your dreams. Your recorded observations of what’s happening today will give you a clearer vision of what to do tomorrow – and many years beyond.

Starting Your Garden Journal

A note pad, smartphone, and/or computer are all you need to build your journal. Use them to record the dates and details of significant garden happenings, such as the following (with photos, if desired):

  • Flowering and leaf-out times for key garden plants;
  • Impactful weather events such as freezes and storms;
  • Disease and pest outbreaks;
  • Sowing and planting (including what was planted and where);
  • Important maintenance activities such as mulching, shrub and tree pruning, harvesting, and major weeding;
  • Garden amendment, fertilization, and other soil preparation strategies;
  • What succeeded and what performed poorly.

Do a weekly journaling stroll around your garden. When you see something that delights or concerns you or otherwise grabs your attention, take a note or a photograph (or both). Is the perennial border up to something particularly spectacular this week? Are sawfly larvae skeletonizing the swamp hibiscus? Does the rhododendron by the front entry need to be replaced? Make a note (with the date!), along with any associated thoughts that might come to mind.

Garden Journaling Methods

Jotting down notes and smartphone on the side
A note pad and/or Smartphone are all you need to build your journal.

Traditionalists will opt for hand-written journals, but Smartphones make especially good journaling tools, especially for photos. Not only are photos automatically dated, but you can also add text to them and store them by subject. Smartphones are also good for note-taking, via apps such as Google Keep (which can link notes to photos). Then you can organize printed photos and other physical records (such as receipts and empty seed packets) in a binder with plastic pocket sleeves.

If you are one for the computer and a stickler for the details, consider creating spreadsheets to track trends in seed germination, harvests, flowering dates, pest appearance, and so forth. In time, you can create charts showing the ebbs and flows of your garden. These can be very informative.

Winter Garden Journaling

Gardening notebook with supplies
Winter is the time to organize any notes, photographs, and data from the past year that are still at loose ends. It’s also the time to record seed-starting data.

Gardening and journaling continue through winter. There are bulbs to force, catalogs to peruse, seeds to order and plant, house plants to enjoy and maintain, and any number of other winter gardening activities to complete and chronicle. It’s also the time to reflect on gardening seasons past and future. What were the garden’s highlights and successes this year? Where did it fall short? What are your visions and overall goals for next year, and beyond? Get it all down on paper (or microchip).

Finally, winter is the time to organize any notes, photographs, and data from the past year that are still at loose ends. For example, a spreadsheet of the year’s planting data – including plant/seed source and sowing/planting information – will be essential when you get around to ordering and planting next year’s seeds and plants. You can move a copy of the spreadsheet to your smartphone, to join the rest of your journal information. A well-stocked, well-organized garden journal from the previous year is just what you need to get rocking in the upcoming year.

Garden Journaling for Design

Thinking about garden design
Garden design must be planned and continuously recorded for the best success.

Journals are essential for the dynamics of garden design. Your journal will make the greatest impact have these essential planning and design materials on hand:

  • Documentation of the garden site’s layout and characteristics, including maps/plans, soil test results, sun and wind exposures, grades, and extant plantings;
  • Garden design ideas and plans, including drawings and plant lists;
  • An “encyclopedia” of information of special interest to you and your garden, comprising entries on plants, materials, gardening techniques, and other relevant subjects (be sure to include a file on Fafard’s outstanding lineup of potting soils and soil amendments!);
  • Short-term and long-term garden calendars, specifying the sequence of yearly gardening activities, and the long-term (e.g., 5-year) plans for maintaining or renovating the garden and for implementing designs.

Combine these elements with the detailed observations of your journal, and you’ll have all the ingredients to make your dream garden a reality.

Growing Tropical Fruits Indoors

Growing Tropical Fruits Indoors Featured Image
Dwarf Cavendish bananas and calamondins and are super tropical fruits for indoor growing.

Growing tropical fruits in Toledo (or Toronto or Trenton) may seem like the stuff of fantasy. It’s perfectly doable, though, thanks to the numerous dwarf tropical fruit trees that take well to containers and flower and fruit at a young age. A warm sunny outdoor location in summer, an equally sunny indoor niche in winter, a suitable watering and fertilizing regime, and a well-drained growing medium (such as Fafard Professional Potting Mix) will keep them happy and fruitful.

Indoor Citrus

The genus Citrus is particularly well endowed with container-friendly plants. Kumquats (Citrus japonica, aka Fortunella) are a stellar example. Visit your local supermarket during the winter holiday season, and you’re likely to find the orange-yellow, tart, bite-sized fruits of the popular kumquat variety ‘Nagami’. A number of other, lesser-known kumquats are well worth eating (and growing). The cultivar ‘Meiwa’ bears round, orange, 1¼ -inch fruits that are comparatively sweet and seed-free. Large, thin-skinned, orange kumquats deck the branches of another relatively sweet-flavored variety, ‘Fukushu’. In contrast, ‘Hong Kong’ produces numerous showy, scarlet, ¾-inch fruits with large seeds and scanty pulp. They’re great for ornament but not as good for eating.

Kumquat ‘Nagami’
Kumquat ‘Nagami’

Ripening in early winter, kumquat fruits typically remain on the branches until spring, providing decoration and snack possibilities well beyond the holidays. Small, starry white flowers perfume the air in late spring and early summer, and the lustrous, verdant, evergreen leaves are handsome year-round.

Fafard Professional Potting Mix pack

Calamondin (Citrus mitis) is what happened when a kumquat hybridized with a mandarin orange (Citrus reticulata). The result is a compact, repeat-blooming evergreen shrub that carries fragrant white flowers and small, chubby, tasty “oranges” throughout much of the year, with production peaking in winter. The fruits can be eaten fresh and make excellent preserves. Splashy cream-yellow markings adorn the leaves and immature fruit of the calamondin ‘Variegata’.

Meyer lemon (Citrus limon ‘Meyer’) is yet another citrus with admirable qualities. A small evergreen tree that can be easily maintained at 3 feet tall in a container, it produces several flushes of flowers and fruits throughout the year, peaking in winter and early spring. The 2- to 3-inch lemons have thin, golden-yellow rinds and relatively sweet, juicy, flavorful flesh that goes well in salads, stews, and preserves.  They also make a zingy snack.
Among the other edible citrus for containers are Key lime (Citrus aurantifolia), myrtle leaf orange (Citrus myrtifolia), and Rangpur lime (Citrus limon ‘Otaheite’). The takeaway (particularly if you have lots of container-gardening space) is that you don’t have to live in the tropics to enjoy a year-long harvest of lemons, oranges, and kumquats.

Growing Citrus

Citrus prefer ample sunlight, medium to high humidity, 40° to 60° F minimum temperatures, and moderate watering and feeding from spring to fall (with lower amounts in winter).

Prune off unwanted growth immediately after the fruiting season, in early spring.  Common indoor pests can be a problem. Watch for mealybugs, scale, whiteflies, and other common Citrus pests, particularly on stressed or over-fertilized plants. Cleaning plants up with insecticidal soap before bringing them back indoors in fall can help ward off these pests.

Indoor Guava

Pineapple guava flowers (Image by C T Johansson)

Guavas are another group of tropical New World evergreens renowned for their aromatic flowers and fruits, and several can be grown beautifully indoors.

Native to uplands of central South America, pineapple guava (Feijoa sellowiana, aka Acca sellowiana) works wonderfully as a container plant. Lustrous, leathery, silver-backed leaves clothe the upright, gray-barked stems of this handsome small tree. Sweet-scented, pale purple flowers with starbursts of maroon stamens open in late spring and early summer, followed by waxy, blue-green, egg-shaped fruits that cast an intoxicating fragrance as they mature in fall. Their pineapple-flavored fruits (with undertones of mint and apple) are at their best for only a few days after they fully ripen.

Pineapple guava plants require cool winter conditions (40° to 50° F minimum) and at least one cross-pollenizing companion plant for maximum flowering and fruiting. As with all the guavas described here, they appreciate a monthly application of organic fertilizer in spring and summer. Plants can be kept at 4 to 6 feet by removing overgrown stems in late summer.

Dwarf guava (Image by Logee's)
Dwarf guava (Image by Logee’s)

Common guava (Psidium guajava) also takes readily to container culture, fruiting reliably and repeatedly in warm, humid, sunny conditions (60 degrees Fahrenheit minimum). For home growing, choose the true dwarf guava (Psidium guajava var. nana). The fragrant white flowers with bottlebrush stamens recur throughout the year, giving way to pale green-skinned fruits that have delicious, musky-scented, deep pink flesh when ripe.

A vicious weed in many tropical regions outside its native Brazil, strawberry guava (Psidium cattleianum) is an exemplary container plant for colder latitudes, provided it’s spared from temperatures below 50° F. Small, spherical, red-skinned fruits with tangy, pale flesh appear in late summer and continue through winter in favorable locations. The fruits are preceded by fuzzy, white, sweet-scented flowers.  The variety lucidum (commonly known as lemon guava) has yellow-skinned, relatively tart flavored fruits. A small tree in the wild, Psidium cattleianum grows much more compactly in containers, typically topping out at 4 or 5 feet.

Other Indoor Tropical Fruits

Avocado 'Day' (Image by Logee's)
Avocado ‘Day’ (Image by Logee’s)

There’s a lot to explore in container-friendly tropical fruit trees beyond citrus and guavas, including loquat (Eriobotrya japonica), dwarf mango ( Mangifera ‘Pickering’), star fruit (Averrhoa carambola), and the ‘Tainung’ papaya (Carica papaya ‘Tainung’ ), which will begin fruiting on 2-foot plants. Many dwarf common-fig cultivars (Ficus carica), such as the super tiny ‘Petite Negra’ that starts fruiting on 12-inch plants, also grow well in a warm winter sunroom or conservatory. There are even mangoes, such as the golden mango ‘Nam Doc Mai’, that will grow well in large indoor pots.
Another favorite that’s easy to grow is the dwarf banana ‘Extra Dwarf Cavendish’ (Musa ‘Extra Dwarf Cavendish’). Once they reach 3-feet high, they will produce small trusses of delicious bananas year-round, if given high light, regular water, and warmth.

Banana ‘Extra Dwarf Cavendish’

Then there are avocados (Persea americana). Many home growers will opt to start their own trees from pits, but this will result in large trees unfit for indoor growing. Instead, choose a dwarf tree such as the avocado ‘Day’. This compact selection and will produce small avocados from July to September. Bring them indoors in a brightly lit location through winter.

These fruits are best purchased as plants, but most are not readily available at your neighborhood nursery. To find them search for a specialty online plant source, such as Logee’s Plants for Home and Garden. Good online nurseries such as this offer a wide selection of compact tropical plants ideal for indoor container culture.

Potting Indoor Tropical Fruits

Most of these small trees sold in 4- to 6-inch pots, so plants are small at purchase time. Plant them in a slightly larger pot using Fafard Professional Potting Mix, and provide them with good light. Pots should have drainage holes and bottom saucers. Try to maintain even moisture and high humidity, and feed them with a tropical fruit tree fertilizer, as directed.
When the plants begin to outgrow their pots, upgrade them as needed for ample root growth. Those that are fruiting size, usually 4 to 5 feet, require relatively large pots.

Pot your tropical fruits now, and in a year or two, you will be harvesting your own home-grown tastes of the tropics.

Dwarf mangoes
Even mangoes come in dwarf forms!