Articles

Garden Planning 101

Kniphofia 'Border Ballet' in garden
Remember that many great gardens have been planned on scrap paper and built on a shoestring. (Photo by Jessie Keith)

In February, home gardens may be covered with snowdrops or blanketed with snow, depending on climate zone and the whims of Mother Nature. Either way, it is time for garden planning. New ideas are ready to break dormancy, even if the outdoor plants aren’t quite there yet.
Fafard Premium Topsoil packSomewhere there is a vast garden planning spectrum, with places on it for all of us who love to dig in the dirt. The meticulous planners are at one end, plotting layouts, bloom times and expenditures in careful detail every year. They keep excellent records and can tell you precisely how much they paid for a new lilac in 2002 and the exact day that it produced its first blossom. The seat-of-the-pants gardeners are at the extreme opposite end. These are the people who make every garden decision on the fly. When spring arrives, they get in their cars and create highway havoc by braking suddenly in front of every alluring garden center display. Often these mercurial individuals go on to jeopardize their credit limits by making extravagant impulse purchases of plants, tools and garden décor. No matter where you are on the spectrum, a little planning is a good investment.

Dream Big

Define your dream garden in words or images, even if your vision goes way beyond your current means. Great gardens or landscapes begin with big plans. The same goes for plant lists. When you first page through paper or online plant catalogs, flag anything that catches your eye. The process will help you understand the colors, shapes and plant types that you love best at this particular stage of your gardening career. It will also speed you through the end-of-winter doldrums and pave the way for the list-whittling and prioritizing you will do down the road.

Some of the best garden ideas have been inspired by “borrowed” landscape elements. Start Your Garden Plan

Think about your entire landscape, including hardscaping, structures and established plantings. Decide what you want to keep, modify or eliminate completely. Even if you are starting with a property that has been completely cleared, at least one landscape element is already in place—the view. For better or worse, the view of your own property and that of your neighbors, is part of the existing scheme. Some of the best garden ideas have been inspired by “borrowed” landscape elements. Some even better ones have sprung from the necessity of hiding something ugly.

Plan a Garden You Can Manage

Get a realistic grip on your gardening/landscape resources. This includes your discretionary time as well as money. Figure out how much of both you have available for garden-related expenditures and tasks. Your dreams may include large, color-themed beds and borders, with razor sharp edges and hundreds of linear feet of precisely clipped hedges. If your reality includes about an hour a week of garden maintenance time, you will either have to hire someone to do much of the work, stretch out your plans over a long time frame or redefine your goals.

Making Arrangements for Your New GardenWinter Landscape

Once you have defined your vision and resources, it’s time to move ahead. Do you have the time and/or money to make big changes, like removing a mature tree or building a water feature? If so, get contractor recommendations from friends and family and call contractors for quotes. In spring, landscape professionals and builders have full calendars. Starting early ensures that your jobs will be on them. If smaller DIY changes are more your style, figure out how best to accomplish them. Sketch out planting schemes or designs, either on paper or with the help of online gardening tools. Whittle down plant wish lists and, if possible, order plants that you won’t be able to find at local garden centers. Many vendors offer early bird discounts to gardeners willing to order at the end of winter. Make a list of the basic supplies you will need, including new or replacement garden tools and products like Fafard Premium Organic Compost and Premium Topsoil.

Garden Limits

Imagination has no limits, but most other resources do. If money is a problem, borrow tools or buy them cheaply at garage and tag sales. Plan to divide existing perennial plants and ask friends if they will share divisions or cuttings from their gardens. Start annuals and edible crops from seed. If your soil is bad or non-existent, plan a container layout using repurposed vessels. Remember that anything that can hold a quantity of damp dirt can serve as a plant pot. Start small, with a simple plan, and add to it as time and finances permit. Remember that many great gardens have been planned on scrap paper and built on a shoestring.
Planning ahead lets you make the most of whatever you have and gives you a jump-start on the gardening season. It is also an excellent tonic for the winter-weary soul.

Planting during gardening season
Planning ahead lets you make the most of whatever you have and gives you a jump-start on the gardening season. (Photo by Jessie Keith)

Indoor Bloomers for Midwinter Cheer

Streptocarpus 'Party Pinafore'
Streptocarpus ‘Party Pinafore’

Most of us in the Frozen North could really use a hit of spring about now. How about flowers, for instance? Or better yet, how about a lush plant in full bloom, providing a colorful (and therapeutic) dose of midwinter cheer?
That won’t be happening in most of our gardens for a few weeks yet (although here in southern New England the early witch-hazels often open their spidery blooms before February is out). On the other hand, any number of plants will provide a bevy of winter blooms in a sun room or kitchen or any suitable indoor space, given a modest investment of care. Furthermore, some of them double their display with equally showy foliage.

Purple-leaved Oxalis

One sure sign of spring’s approach is the mass arrival of purple-leaved oxalis (Oxalis triangularis) in supermarkets and department stores, in anticipation of St. Patrick’s Day. This handsome and easy-to-grow perennial is much more than a one-holiday wonder, however. Although the deep-maroon, three-lobed, shamrock-like leaves give it obvious St. Patty’s Day caché, they are perhaps even more appealing in winter, especially when punctuated with the pale pink, funnel-shaped flowers that this South American native produces year-round. Plants can also be purchased as “bulbs”, which are actually scaly, caterpillar-like underground stems (rhizomes) that should be planted horizontally an inch or two below the soil surface in Fafard® Professional Potting Mix. Full to partial sun, almost any potting mix, and anything but total neglect will keep this tough perennial happy. It is also remarkably cold-hardy, functioning well as a foliage accent in mixed borders and other perennial plantings from Washington DC into the South.

Calathea 'Holiday'
Calathea ‘Holiday’

Calatheas

Calatheas, like purple-leaved oxalis, are typically known and grown for their showy foliage. Yet, a few surprise us with blossoms that stand clear of the foliage in an arresting and anything-but-drab display – rather than cowering blandly near the bases of the leaves. Among the best of these showy-flowered peacock plants are a series of hybrids developed in Indonesia in the early 2000s. And none is better than the cultivar ‘Holiday’, whose striking blooms – with rose-pink, pale-eyed petals tipped with olive-green – open sporadically throughout the year. When not in flower, ‘Holiday’ provides ample ornament with its broadly oval, bright green leaves marked by purple-black chevrons and silvery, purple-edged margins. Other ever-blooming calathea hybrids include ‘Constellation’, ‘Jungle Cat’, ‘Maria’, and ‘Royal Standard.’ (Their flowery parent, Calathea loeseneri, also makes a wonderful subject for a shady indoor nook.) All calatheas prosper in full to partial shade, warm humid conditions (although they’ll tolerate less), and a coarse humus-rich potting medium. Fafard African Violet Potting Mix is a good fit. Repot and divide plants yearly or once every two years.

Cymbidium orchids
Cymbidium orchids grow beautifully in the cool winter months.

Orchids

Terrestrial to semi-terrestrial orchids of many types bloom beautifully in the winter months. Most notably are Cymbidium, Paphiopedilum, and Phaius species, grexes, and cultivars. All provide bright, long-lasting floral color and thrive in Fafard’s Premium Orchid Mix, which offers a perfect blend of fir bark, chopped coir and perlite. 

Spiral Ginger

For sheer nonstop flower power and ease of care, few plants can match spiral ginger (Chamaecostus cuspidatus, formerly Costus cuspidatus). The golden-orange, ruffle-edged, blooms look almost orchid-like and appear year-round on cane-like, 2-foot-tall stems clothed with glossy, dark-green, broadly lance-shaped leaves. Flowering is most abundant in summer, but blooms continue to open throughout fall and winter, particularly in warm humid niches. Give it bright shade, a fertile compost-rich growing medium, such as Fafard® Organic Potting Mix, and moderate watering for maximum display. Other members of the costus tribe, like dwarf cone ginger (Costus woodsonii) and crepe ginger (Cheilocostus speciosus), thrive in similar conditions, and are also well worth seeking out.

Oxalis triangularis 'Francis'
Oxalis triangularis ‘Francis’

Streptocarpus

No discussion of winter-blooming (and ever-blooming) houseplants would be complete without mention of cape primroses. Members of the southern African genus Streptocarpus, and close relatives of African violets, these little evergreen perennials perch easily on a modest windowsill (fitting happily in a 4-inch pot), where they bloom their heads off year-round, the funnel-shaped flowers smiling from atop wiry, 4- to 8-inch stems. Hybrids abound in all manner of luscious exotic colors and patterns, with the flowers’ two rounded, ear-like upper lobes typically differing in hue from the three lower ones, and their throats often bearing dramatic contrasting streaks. Partial shade, Fafard African Violet Potting Mix, mild humid summers, and coolish somewhat drier winters will result in nearly constant blooms, and loads of midwinter cheer.

All About Seed Starting

The seed-starting season is upon us. Soon loads of colorful and alluring seed catalogs will be populating websites and mailboxes nationwide. For the ardent gardener, raising plants from seed has huge benefits. One can grow cooler homegrown plants from seed for less than purchasing from most garden centers, but it’s not without challenges.

Even advanced gardeners need a little know-how and experience to produce homegrown seedlings that are as robust as nursery-grown; the key is maintaining the right balance of light, temperature, soil, nutrition, and water through good care and smart decision-making.

Homegrown Plants from Seed: Various Seed Packets
There’s a reason why seed-starting is popular. Gardeners can grow cooler plants, for less.

Seed Starting No Nos

Seedling woes and mishaps are many. Truth be told, the average seed grower tends to grow leggy, pale green, weak plantlets rather than stout, multi-stemmed, medium green ones. The causes are basic: poor light causes legginess and pale color and inadequate nutrition, poor soil and/or improper watering can all cause poor growth and weakness. This matters because weak seedlings have a higher mortality rate and are slower to establish, while robust seedlings look better, fill out faster, and yield more flowers and fruits sooner.

Good growing light is most essential because too little causes etiolation (long, spindly, pale growth) and too much causes foliar burn. Gardeners lacking a sunny conservatory or greenhouse should choose the next best thing, a light table. And for high-grade seedlings refrain from window-growing; even south-facing-window-light is rarely uniform or strong enough for robust growth. A growing table fitted with broad-spectrum shop lights will do a much better job.

Four Steps to Good Seed Starting

Here are four growing table “dos” to abide by:

  1. Do choose the right location and table. A warm, sunny room is ideal. Prefabricated grow tables (sold by many seed vendors) are handy but expensive. Standard 4-level utility shelves (sold at home improvement centers) fitted with shop lights are just as effective and much cheaper.
  2. Do choose the right fixture and bulbs. Standard 48-inch shop lights can accommodate two flats of seedlings, and high-Intensity fluorescent bulbs have the broadest spectrum for good growth. (Avoid metal-halide high-intensity discharge (HID) bulbs, which are expensive, hot, and unnecessary.)
Homegrown Plants from Seed: Seedlings Placement
Place seedlings a few inches from high-Intensity fluorescent bulbs to keep them from becoming leggy.

3. Do place your seeds and seedlings at the right distance from the light. Pots and seedlings should be kept 2-to-3-inches from fluorescent bulbs and fixtures hung from chains for easy height adjustment.

4. Do slowly acclimate sun-loving seedlings to natural light before outdoor planting. Sunlight is stronger than artificial light and can burn tender seedlings. Over seven to ten days, slowly move seedlings from indirect outdoor light to full exposure—increasing exposure by two hours every two days.

Homegrown Plants from Seed: Help Seedlings Adjust to Natural Sunlight
Exposure to dappled sunlight can help seedlings adjust to natural sunlight more quickly.

Seed Starting Containers and Mix

Containers and growing medium are the next essentials. Standard six-cell, six-pack growing flats with non-draining trays are perfect for most seedlings, and Black Gold Seedling Mix, with its blend of high-grade Canadian Sphagnum peat moss and perlite, is recommended. It is also easily wetted and uniformly fine for light seed coverage. Light coverage is essential because most seeds naturally germinate on or close to the soil’s surface, so when planting seeds stick to the mantra “lighter coverage for lighter seeds and greater coverage for greater seeds.”

Dust-like seeds can simply be sprinkled on the top of the medium, and large seeds rarely need to be planted deeper than ¼ of an inch—despite what some seed-starting guides advise. Seeds can also be lightly covered with washed or fine vermiculite instead of mix. Coverage with both is shown to reduce instances of “damping off” (seedling fungal disease); planting in the fresh, unused mix also reduces damping off.

Seed Starting Temperature

Temperature needs vary from seed to seed and plant to plant; some like it cool and others like it warm, but most thrive at room temperature (68 degrees Fahrenheit). Warm-season plants, like tomatoes, peppers and zinnias, germinate and grow faster with warmer temperatures; a seedling heat mat will hasten germination and growth for these and other summer growers. Temperature needs vary from seed to seed and plant to plant; some like it cool and others like it warm, but most thrive at room temperature (68 degrees Fahrenheit). A heat mat for seedling flats costs around $25.00 and will last for years.

Watering Seeds

Good watering technique will make or break growing success. The key is remembering that overwatering is worse than underwatering. Too much water encourages fungal disease and root and stem rot and invites pests like fungus gnats, whose larvae feed on seedlings, and shore flies, whose excrement damages seedlings. Once these problems are established, they are hard to get rid of.

Homegrown Plants from Seed: A Perfect Seed Waterer
Left: A plastic bottle with holes punched in the top makes a perfect seed waterer! Right: Be sure to allow only one seedling per planting cell for best success.

To avoid overwatering seeds and seedlings: (1) water gently and (2) water until mix is moist but not wet. These steps are most important before and right after seeds germinate because seeds and seedlings use less water and are easily drowned. A plastic water bottle with five holes poked into top makes a great gentle seed and seedling waterer (see photo). Bottom watering with a self-watering capillary mat is also recommended. Just be sure that no standing water remains at the tray base at any time.

Homegrown Plants from Seed: Properly Grown Seedlings
Properly grown seedlings should have healthy roots to the bottom of the pot.

Seedling Care

Once plants develop multiple leaves, more water can be applied. The amount ultimately depends on how quickly plants are growing and using water. It’s wise to check fast-growing seedlings twice daily to assess their water needs. If you think you may be watering too much, err on the side of less water. Slight wilting is better than rot and ruin. If seedlings need to be upgraded, move them to 4-inch pots filled with Fafard Ultra Potting Mix with Extended Feed for fast growth and success.

Seedling Fertilization

Nutrition is not a factor until plants develop their “true leaves” (sometimes called the second set of leaves). In fact, fertilizer can actually inhibit seed germination and burn new seedlings, which is why good seed-starting mixes are always fertilizer-free. Once seedlings have reached two inches or so, a feather-light sprinkle of light starter fertilizer will keep them pot-healthy until planting day.

Hardening Off Seedlings

When the threat of frost has passed, incrementally introduce your flats of plantlets to the great outdoors. Incremental exposure allows tender plants to healthfully acclimate to the high light, wind and temperature changes of the garden. Start by placing them in a protected location with diffuse light and slowly move them into a more open spot with higher light. After seven to ten days your plants should be garden-ready, and if you follow this guide they should look like those grown by the pros!

Homegrown Plants from Seed: Happy Seedlings
Happy seedlings have good colors and are not leggy.
Homegrown Plants from Seed: Homegrown Fennel Plantlets
Homegrown plantlets, like these fennel, should only be planted in the garden after they have hardened off.
Homegrown Plants from Seed: Homegrown Cabbage Seedlings
These newly planted homegrown cabbage seedlings are healthy and robust!

Christmas Cactus (or should that be Thanksgiving Cactus?)

Schlumbergera
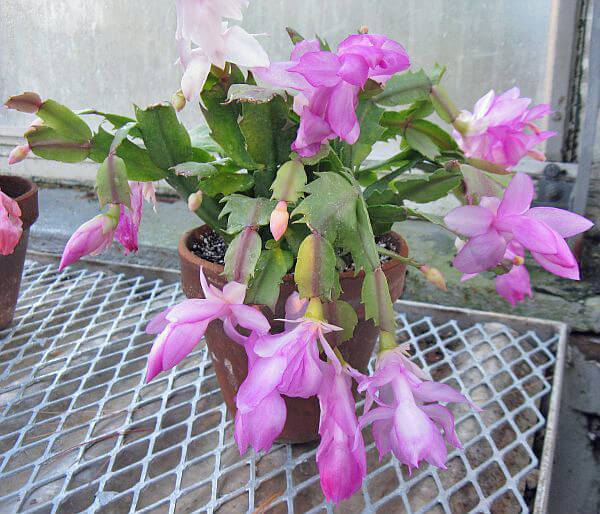
Schlumbergera are welcome houseplants for the winter season.

Although bought and sold by the millions during the Thanksgiving season, “Christmas cactus” remain something of an enigma.  For example, why do plants that bloom at Thanksgiving bear the name “Christmas”?  why do they reputedly mope as houseplants, when they bloom so lavishly in your local supermarket?

Their form itself is puzzling. The showy blooms arise directly from what appear to be arching chains of fleshy leaves, which in fact are flattened, narrow-jointed stems. The shape and spininess of these leaf-like stem segments are key to identifying Christmas cactus and its relatives, which all belong to the genus Schlumbergera.

Christmas Cactus Types

Crab (Thanksgiving) Cactus blossom

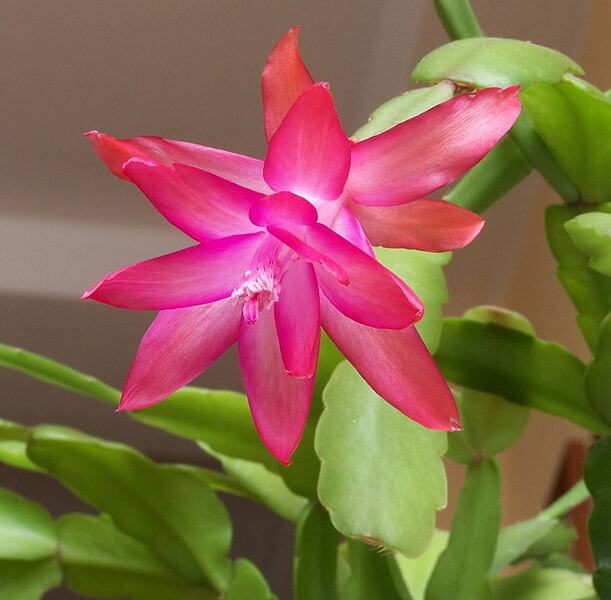
Crab (aka Thanksgiving) cactus, Schlumbergera truncata is the most common type grown and blooms around Thanksgiving.

Examine the stem segments of the Schlumbergera that throng the stores as Thanksgiving approaches, and you’ll discover the answer to the riddle of their name: they aren’t Christmas cacti at all. Almost all plants sold under the Christmas moniker exhibit the jagged-toothed stem segments characteristic of crab (aka Thanksgiving) cactus, Schlumbergera truncata. In contrast, true Christmas cacti possess bluntly toothed segments that bear pendent (rather than horizontal) blooms in early winter.  If you want a yuletide Schlumbergera, look for varieties of the real McCoy, Schlumbergera x buckleyi  (the hybrid between Schlumbergera truncata and Schlumbergera russelliana).  If you want a Thanksgiving cactus – go to your local garden center or upscale grocer right about now.

Schlumbergera x buckleyi blossom
Schlumbergera x buckleyi is brightly colored and bloom close to Christmas time.

Whichever Schlumbergera you bring home from the store, one thing’s for certain: it ultimately comes from moist, humid, relatively cool upland forests of Southeast Brazil, home to all six species in the genus. In their native haunts, these succulent evergreens grow as epiphytes and lithophytes, taking root in decayed leaves and other detritus that accumulate on moss-covered tree limbs and rock ledges.

Cultivating Christmas Cactus

They are easily cultivated (and flowered) in conditions that mimic their natural circumstances: bright full shade; well-drained, humus-rich, evenly moist growing medium; moderate to high humidity; and moderate temperatures. A hanging basket filled with Fafard Ultra Container Mix will suit them nicely, as will a northeast- or northwest-facing windowsill, or a lightly shaded southern exposure. Water them thoroughly when the top inch or so of the growing medium is dry, applying a complete liquid fertilizer every few waterings.  Many Schlumbergera aficionados keep their plants outdoors (either suspended on hooks or elevated on stands) during the frost-free season.  A spot under a shade tree will provide ideal spring to fall growing conditions in most parts of the United States.

Lighting

Contrary to popular horticultural myth, neither Christmas nor Thanksgiving cactus requires any mystical lighting, watering, or temperature regimens to induce them to bloom.  Although lengthening nights do indeed trigger flower bud development, natural light cycles at United States latitudes (where winter nights are considerably longer than those in the plant’s native Southeast Brazil) provide ample darkness. Placing the plants in a dark closet for 14 hours a day (as is often and erroneously prescribed) may slightly hasten bud development, but is not required (and may do more harm than good).

Temperature

Temperatures below 60 degrees F will also encourage bud formation, but “more cold” will not result in more flowering (and white- and yellow-bloomed varieties will become pink-tinged if brought from bud to flower at sub-70-degree temperatures).  In most parts of the United States, ambient outdoor temperatures and natural illumination (with no strong artificial night lighting) will do quite nicely. So rather than exiling your cactus to a closet, move it to a shaded porch for a late-summer to early-fall vacation. Plants may even rebloom in late winter if they continue to receive long nights and proper care.

Christmas Cactus Varieties

Schlumbergera truncata Wellesley

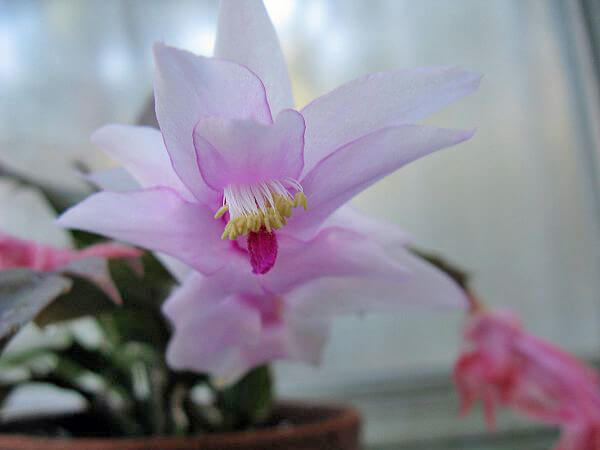
Schlumbergera truncata ‘Wellesley’ is a pretty pale pinkish-purple variety.

Schlumbergera fanciers have it good these days: the numbers of Thanksgiving and Christmas cactus varieties rival those available in the nineteenth century, when Schlumbergera were widely grown and highly popular. Many cultivars (often un- or mis-identified) of Schlumbergera truncata and its hybrids are grown and sold, including new developments such as the Reginae Group, a series of crosses between Thanksgiving cactus and the relatively early-blooming Schlumbergera orssichiana.
Real Schlumbergera maniacs might want to give some of the more obscure and difficult species a try, including the aptly named prickly-pear schlumbergera, Schlumbergera opuntioides, and its hybrids. Christmas comes many times a year if you’re a Schlumbergera enthusiast.

Savoring & Sowing Winter Root Vegetables

Rutabagas
Rutabagas are delicious, productive root vegetables perfect for winter growing.

Late fall still brings garden bounty in the form of earthy, late-season root vegetables—turnips, parsnips, winter carrots and rutabagas among them. Not just any root vegetable is adapted for colder seasons. The best are made for fall and winter—remaining crisp, sweet and delicious even after deep frosts. All are also bestowed with remarkable storage qualities.

For most Americans, the best time to start these vegetables is in early fall, but those with cold frames, or those living further south, can continue to grow cool season root vegetables well into winter. All one needs are growing temperatures that remain between 35 to 60 degrees F, fertile soil that’s deep and light, full sun and protection from wind. Amending soil with Fafard® Premium Topsoil and top-dressing with a layer of Fafard® Premium Organic Compost will encourage healthy growth while protecting plants.

Daucus carota 'Kinko'
Crisp winter carrots can stay in the ground in the cold of winter.

Rutabagas are the underground kings of the cool season vegetable patch. One enormous, globe-like, purple-topped white or yellowish root can be enough to feed a family, and the sweet cabbage-like flavor adds a pleasant wintery taste to stews and mashed vegetable blends. The high-yielding behemoth ‘Helenor’ is a great purple-topped variety for new growers to try. The best time to plant them is in early fall, where winters are cold, or late fall, where winters are mild. Their round seeds should be lightly covered and will germinate in 7 to 15 days, if planted when temperatures are a little warmer (optimally around 65 degrees F). On average, they take between 80 and 100 days to mature, depending on the variety.
Winter carrots are distinguished by several characteristics. First, they tend to be cold hardy and store very well. Many even overwinter well in the ground. Two great carrots for winter growing include the sweet, medium-sized, orange carrot ‘Napoli’ and the comparable ‘Merida’. Both are remarkably cold resistant and remain pleasant and sweet during the cold months. In most areas, mid-fall is a good time to plant these for winter growing, but further south or under cover they can be planted into late fall. In really cold areas, hoop row covers are recommended for protection. The small, flattened seeds should be lightly covered and will germinate in 12 to 15 days if given moderately warm days between 70 and 75 degrees F.

Hakurei turnips
Pure white ‘Hakurei’ turnips have an unusually sweet, crisp flavor and texture.

Turnips may be round or elongated, purple-topped or all while, but all are easy-to-grow cool weather vegetables. Their sweet flavor is best enjoyed cooked, though crunchy fresh turnip salads or relishes are not uncommon. The fast-growing vegetables can mature between 30 and 60 days, depending on the variety, and their small round seeds germinate quickly in as little as seven days. Two excellent varieties for flavor and performance are the classic ‘Purple Top White Globe’ and pure white-rooted ‘Hakurei’, which is best eaten fresh. It can be a challenge to start parsnips from seed (they are notoriously slow, taking 14 to 25 days), but it’s worth the effort. The large, ivory-colored, carrot-like roots are delicious when cooked—lending a unique sweet flavor to dishes. The long, tapered cultivar ‘Javelin’ is a great variety for overwintering and maintains a clean ivory color.

Classic turnips
Classic purple-topped turnips are the best for cooking.

Mice, voles and other critters are big root vegetable enemies—especially in cold months when food is harder to come by. Several measures can be taken to keep rodents away from your root crops. Fine-holed wire mesh fences sunk into the ground around a plot and extending above ground 12 inches or more will dissuade most of these critters. Some commercial repellents can also be helpful; just be sure they are approved for vegetable gardening.
Die hard food gardeners continue to grow crops such as these into the winter months, and with a little effort you can too. Build a cold frame or buy a few row covers and get your winter root veg into the ground while you still can.

Savory Winter Root Vegetable Mash

Nothing is nicer for fall and winter festivities than a savory vegetable mash of potatoes, rutabaga and parsnips. This simple recipe is also healthier than your standard mashed potatoes because rutabagas are high in vitamin C and potassium and parsnips are high in folate.
Ingredients
1 lb peeled Yukon Gold potatoes
1 lb peeled cubed rutabaga (2 inch cubes)
1 lb peeled, thickly sliced parsnips
3 tablespoons soft butter
¼ cup heavy cream
A dash nutmeg (optional)
salt and pepper to taste
Directions
Place vegetables in a medium-sized saucepan, and just cover them with water. Put the pan on high heat; add a pinch of salt and cover. Bring the water to a boil and reduce the heat to medium, keeping the pan covered. After 15 to 20 minutes the vegetables should be fork tender. Remove the pan from the heat.
Drain the vegetables and potatoes and place them in a large bowl. Add the cream and butter. Using a potato masher, gently mash the mix until fairly well mashed. Add salt, pepper and nutmeg, then, using a hand mixer, whip the vegetables just until smooth. Be careful not to over beat the vegetables. Add a little additional cream, if needed.