Articles

Managing the Five Most Common Apple Diseases

Managing the Five Most Common Apple Diseases Featured Image
Click Here button for Nursery Ready Plant List

Don’t be afraid to grow your own apples. Sure, most varieties are rife with disease problems, but there are varietal exceptions, and smaller trees make management easier. Choosing disease-resistant apples and understanding care requirements will make for a reliably healthy harvest. Aspiring orchardists need not be discouraged.

Before and after steps can be taken to ward off common apple diseases. Preliminary steps include planting and caring for your trees correctly and applying preemptive horticultural oils and other natural pesticides. After problems appear, there are other sprays for disease management. To understand what steps to take, a gardener must be able to identify and understand each disease for management.

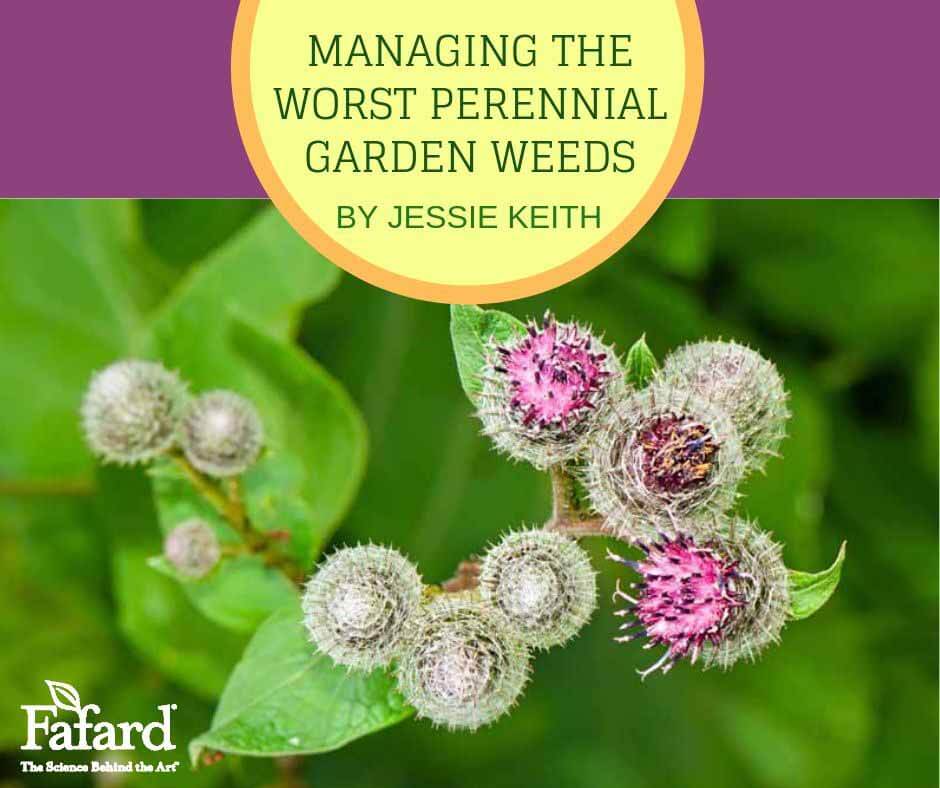
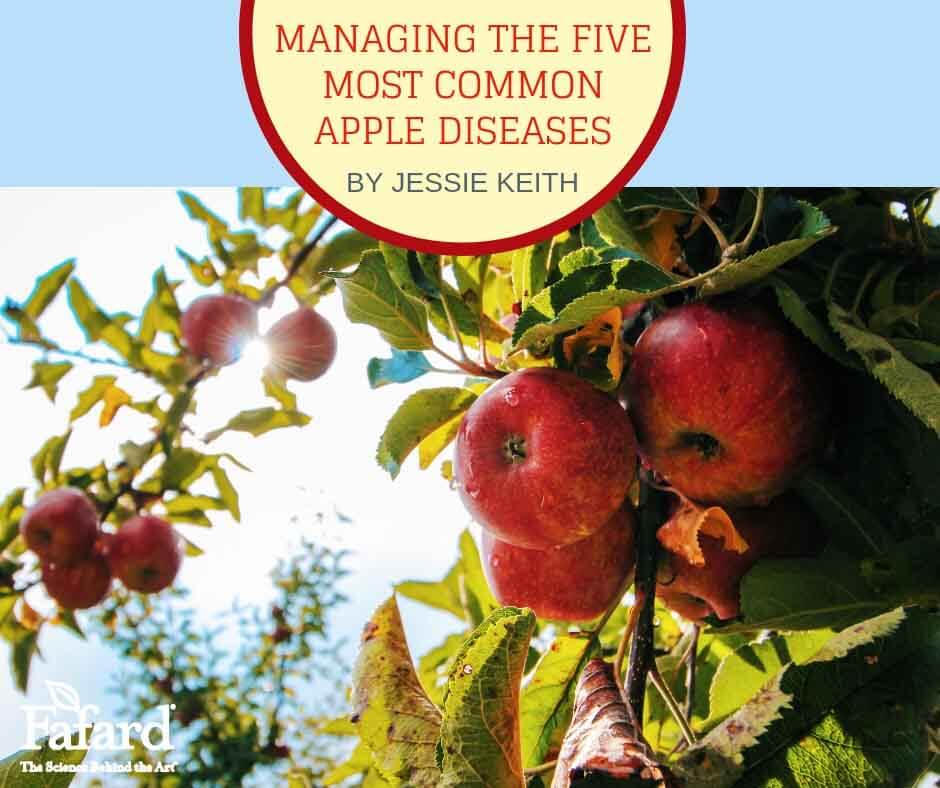
Five Common Apple Diseases and Management

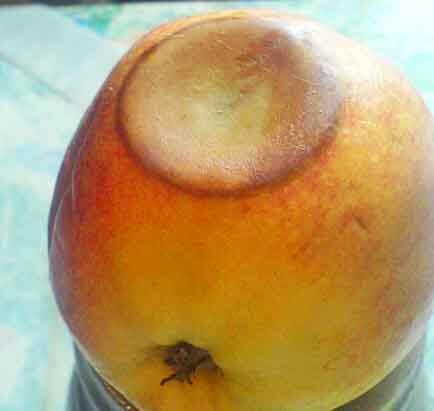
Apple Anthracnose (Neofabraea spp.): Cool, wet weather encourages this fungal disease that causes reddish or orangish circular cankers on the bark, which can open to show the interior wood. Leaf spots and bull’s-eye fruit rot are also expected features. The disease is rarely deadly. Solution: Use a strong copper-based fungicide during a rain-free spell at spring bloom and just before harvest. Remove and burn cankered branches and stems when plants are dormant in winter.

Apples with anthracnose develop bull's eye rot. (Image by Gohnarch)
Apples with anthracnose develop bull’s eye rot. (Image by Gohnarch)

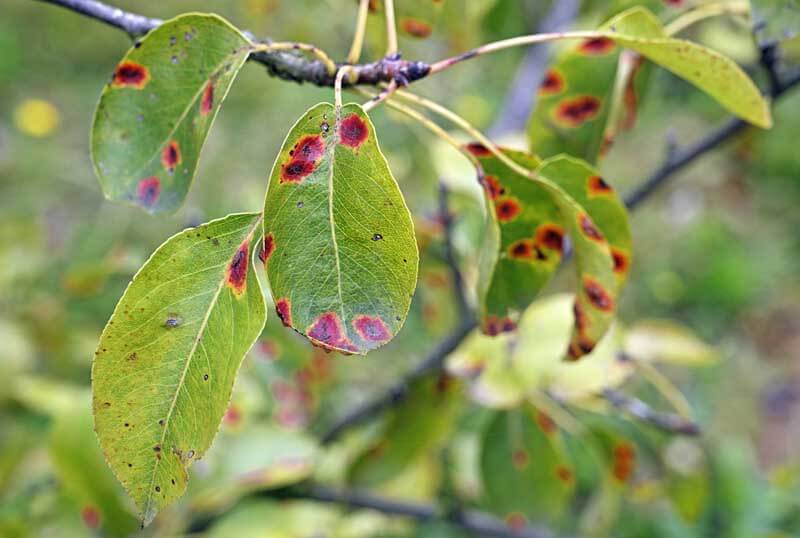
Cedar Apple Rust (Gymnosporangium juniperivirginianae): When trees are infected, orange spots develop on the leaf tops with odd-looking brownish fungal spikes below. The spots weaken trees. Infected cedars and junipers spread the disease to apples, pears, and other related hosts, so fruit growers must avoid planting these evergreens. Solution: Apply a fungicide for rust, such as Neem oil, when the trees are in bloom if a tree has shown signs of the disease in the past.

Cedar apple rust spots
Cedar apple rust spots are orange on top with fungal spikes below.

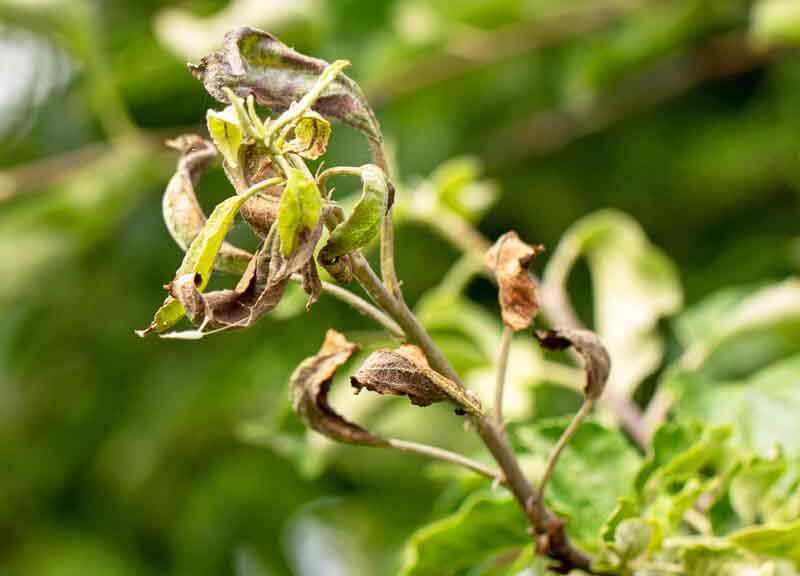
Fireblight (Erwinia amylovora): Fireblight is an easily identifiable bacterial disease that’s spread when it’s rainy. It gives leaf tips, flowers, and stem tips a scorched look. Stem tips curl as they die. Infected leaves dry up and turn brown or black. Badly infected trees develop cankers with orangish bacterial ooze on branches and twigs. Solution: Remove and burn branches with signs of the disease when plants are dormant in winter. If weather conditions are moist at bloom time, spray them with a fireblight bloom spray. Throughout the season, look for the early onset of symptoms and cut and burn infected stems as they appear.

Fireblight leaves and stems
Leaves and stem tips look scorched when they have fireblight.

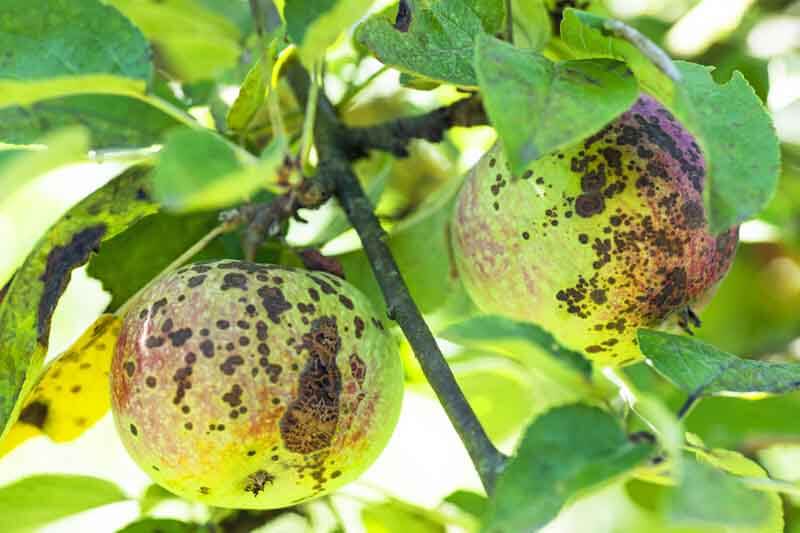
Apple Scab (Venturia inaequalis): Both fruits and leaves are damaged by this fungal disease. Apple scab overwinters on leaf buds and shows itself when weather conditions become warm and moist. Leaf spots are green and velvety and then turn black. Eventually, whole leaves succumb and die. Infected fruits have scab-like cracked or bulbous spots. Solution: Apply copper fungicide spray or Bonide® Citrus, Fruit & Nut Orchard Spray, according to the manufacturer’s recommendations, just before bud break and through to early fruit set.

Apple scab
Apple scab is very easy to identify on fruits.

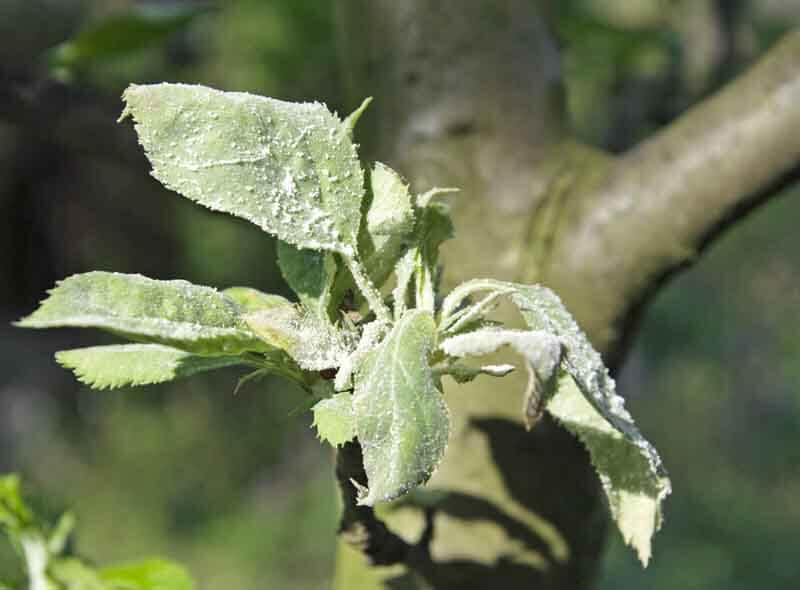
Powdery Mildew (Podosphaera leucotricha): Warm, moist or dry weather favors this fungal disease. A powdery substance cover young leaves and new shoots, causing them to crinkle and curl. Solution: Apply the all-natural, potassium bicarbonate-based Greencure® foliar fungicide spray until symptoms are gone.

Apple leaves infected with powdery mildew
These apple leaves are infected with powdery mildew.

Note when you spray different pesticides. For example, copper fungicide sprays should be applied 10 days after an application of dormant oil spray. Use home pressure sprayers for application. (Click here to learn more about horticultural soil sprays and their use.)

Disease Resistant Apple Varieties

Espaliered apple on disease-resistant, dwarfing rootstock
This espaliered apple is on disease-resistant, dwarfing rootstock.

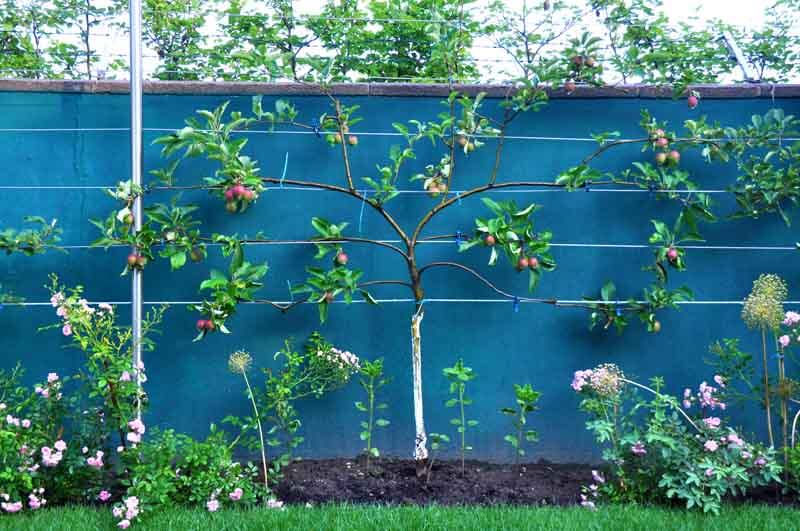
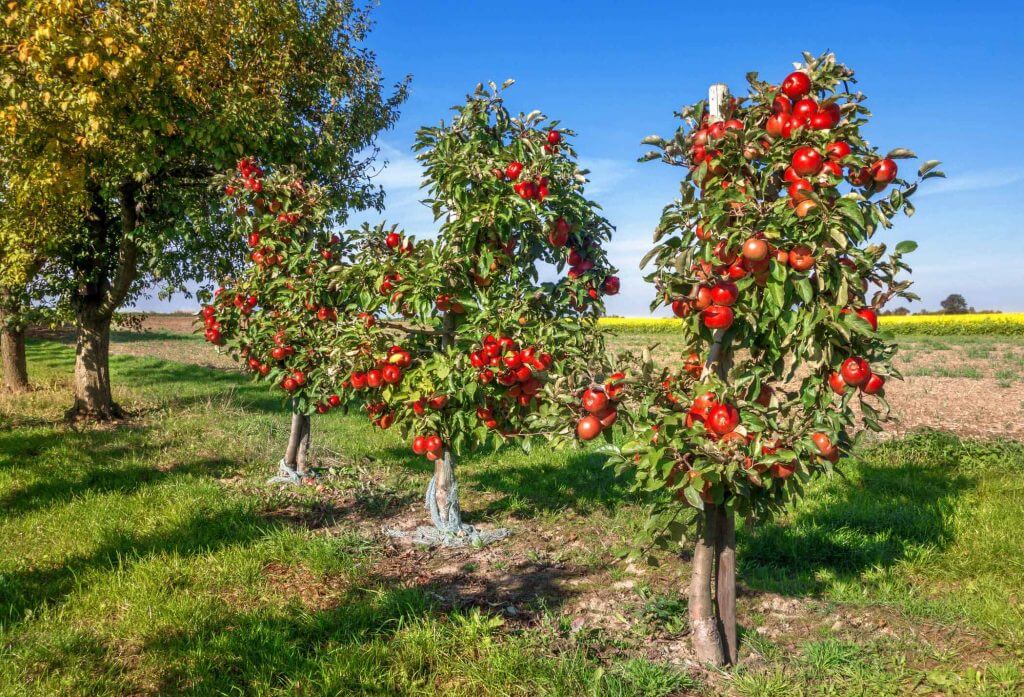
Disease-resistant apple varieties and root stocks make control much easier. Different root stock varieties can also impart vigor and productivity. Tree size is also dictated by the rooting stock, resulting in dwarf, semi-dwarf, or mid-sized trees. (Even the smallest garden can accommodate a couple of dwarf apple trees in large pots or espaliered against walls.) Nursery-purchased apple trees are generally grafted onto good stock with just tree size being variable. (Click here to learn more about apple root stocks.)

Newly cultivated apples are bred for disease resistance as well as flavor. These are the best apples to grow organically because they require little to no spray. Sadly, most heirlooms are very disease susceptible, though a few show some resistance. The 19th-century cultivar ‘McIntosh’ (19th century) is resistant to cedar apple rust and powdery mildew, and ‘Winesap (18th century) is resistant to cedar apple rust. Here are five of the best newer disease-resistant varieties available:

Dwarf apple trees
Dwarf apple trees are space-saving and can be very productive.
  • CrimsonCrisp™: A sweet, crisp apple with deep red skin that’s highly resistant to apple scab and moderately resistant to fireblight and powdery mildew.
  • Enterprise‘: A firm, crisp, tart red apple with high resistance to apple scab and moderate resistance to cedar apple rust and fireblight.
  • Goldrush‘: A tangy, sweet golden apple with high resistance to apple scab and moderate resistance to fireblight.
  • Jonafree‘: A flavorful, low-acid, red apple that bears heavily and is very resistant to apple scab.
  • Liberty‘: A yellow and red apple that’s crisp, sweet, tart and shows great resistance to apple scab, cedar apple rust, fireblight, and powdery mildew!

All apples require cross-pollination, so you need to plant yours with compatible varieties for fruit set. (Click here to view compatible apple varieties for cross-pollination.)

Planting and Care

Adding bark mulch or compost around a newly planted tree
Add 2 to 3 inches of bark mulch or compost around the newly planted tree.

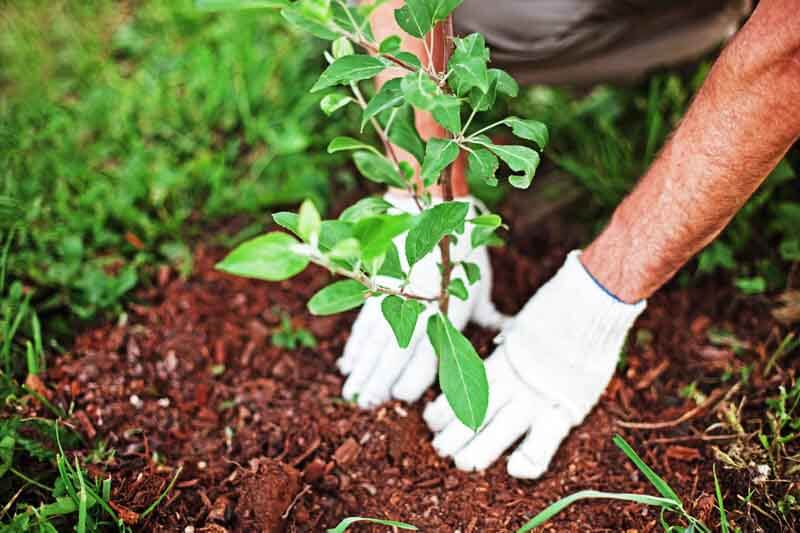
Plant apples in spring or fall. You can buy either nursery or online stock. Trees purchased online will be smaller and take longer to establish.

At planting time, dig a hole to the same depth as the root ball and three times as wide. Place the backfill on a large tarp or in a wheelbarrow and mix it with Fafard Premium Natural and Organic Compost at a 1:2 ratio. Sprinkle in an all-purpose tree fertilizer, using the manufacturer’s recommendations.

Fafard Premium Natural & Organic Compost Blend pack

Center and hold the tree straight in the hole. Make sure the top of the root ball meets the lawn’s soil line. Then plant it with the amended backfill and tamp it in to remove air pockets. Water deeply after planting, filling in any low spots as they appear, and then add 2 to 3 inches of bark mulch or compost around the newly planted tree. Continue watering one or two times a week for at least two months during dry spells.

Good apple selection and disease management will leave growers with few disease worries. Apple pests are another matter, but they are often far less destructive if populations are low to moderate. Planting compact apples will make care even easier. So be daring and plant one or more apple trees this fall.

10 Worst Garden Weeds and Their Management

Managing the Worst Perennial Garden Weeds Featured Image
Burdock is a very difficult weed that pops up along yard perimeters and in gardens.

What makes a garden weed the worst? Four attributes make weeds very difficult to manage. These are 1) deep perennial roots, 2) re-sprouting roots, 3) lots of fast-to-germinate seeds, and 4) fast robust growth. Then you have the added bonus of weed nasties that are toxic and prickly. These are the weeds that take a productive garden bed and turn it into an impossible mess fast. If you have any of these in your garden, weekly weeding will be a necessity until they’re eradicated.

Noxious garden weeds vary based on where you live nationally, so those covered are ubiquitous across the whole of the US, though some are more regionally problematic.

Field Bindweed

Field Bindweed
Field bindweed is a twining vine that can cover gardens and shrubs in no time.

If you have a field bindweed (Convolvulus arvensis) infestation, you are in trouble. This fast-growing vine is one of the most aggressive, difficult perennial weeds to remove, and its little white morning-glory-like flowers produce lots of seeds. The main problem is with its white-rooted runners that spread deep and wide, making it very difficult to dig out. Leave just a piece, and it will resprout. These roots then become mixed up with shrub and perennial roots and are hard to reach. Moreover, weed killers won’t touch it. Managing the weed in a three-step process is the only way to get rid of it.

  1. Methodically dig out the white underground runners. Gently loosen the soil around each with a trowel, following them until the growing points are reached and the roots are fully removed. If you keep even a small piece in the ground, it will regrow.
  2. If the runners are intertwined with perennial roots, dig up the perennials, and remove the bindweed roots in full. (Before replanting, amend the soil with Fafard Premium Natural & Organic Compost for faster re-establishment.)
  3. To keep underground roots from returning in really infested areas, cover the area with mulch cloth and mulch it over. After a season, all parts should be smothered, and you can pull up the mulch cloth and resume gardening as usual.

Burdock

Great burdock flowers
Great burdock flowers look much like thistle blooms.

Burdock (Arctium spp.) is a huge, pesky weed of landscape and garden that has the added annoyance of developing giant burrs that attach to pet fur and are hard to get out. If you let a burdock plant go, it will develop a giant clump of huge leaves supported by a giant taproot that reaches deep into the ground. The flower heads look like little thistles and develop into large barbed burrs. The only way to remove a mature plant is with a long, sharp spade. Be sure to dig the root out in full.

Burdock seed heads on pets
Burdock seed heads are huge burrs that attach to pet fur and are difficult to remove.

Ground Ivy

Ground ivy
Ground ivy is a fast spreader that invades lawns and gardens. (Image by Jessie Keith)

Ground ivy (Glechoma hederacea) aggressive member of the mint family is a low grower with creeping stems that form a weedy mat over your garden in no time. It also thrives in lawns, so you will need to rely on a broadleaf herbicide for the lawn if you want to truly get rid of it. (Corn gluten is an organic broadleaf herbicide option.)

Thankfully, this weed is very easy to pull, but it seeds in fast, and if you leave even the tiniest piece in the ground it will root and regrow. The best way to manage it is to remove it from garden beds first thing every spring and then apply a good layer of mulch. If some little pieces try to break through, pull them out quickly.

Canada Thistle

Canada thistle in bloom
Canada thistle in bloom.

Canada thistle (Cirsium arvense) is another of the most notoriously difficult garden weeds. The painfully prickly plants produce copious puffy seeds that get caught in the wind and spread everywhere. Once they become established, a single plant will create a dense colony connected by deep, rooting rhizomes that are impossible to dig out entirely. If you leave just one piece, it will form a whole new plant. Plus, it is resistant to herbicides.

Canada thistle in seed
Canada thistle in seed.

To remove Canada thistle, the best method is smothering plants with weed cloth and mulch until they are gone. This one will also creep into the grass, so try to keep lawn specimens under control with broadleaf herbicide. You also don’t want to let this one go to seed anywhere near your yard or garden.

Johnsongrass

Johnsongrass
Johnsongrass is a tall, tough weed grass. (Image by Harry Rose)

The pattern with these perennial weeds is that most have underground stems and roots that spread and resprout if one piece is left in the ground, and they all produce tons of seed that gets quickly spread hither and yon. Johnsongrass (Sorghum halepense) does this, too. This tall, tough grass requires a spade to remove, and gardeners must follow the trailing stems to capture all underground parts. The tip of each root is sharp, so beware.

Thankfully, most of its underground runners stay close to the soil surface, so they are easier to remove. You also want to get rid of specimens before they bloom and set seed in summer.

Mugwort

Mugwort
Mugwort was brought to North America as a garden medicinal and has since become a terrible weed.

Mugwort (Artemisia vulgaris) is another massively aggressive spreader. And, sadly, this plant was brought to the states as a medicinal herb and flavorant for ale. It has since spread across the eastern United States and the whole of Canada.

The plant has a strong, resinous smell and spreads by the most aggressive lateral underground runners ever. Like Johnsongrass, these mostly remain near the soil surface, but they are so numerous that one has to dig extensively to remove the whole underground plant. I suggest a sharp spade and trowel and lots of elbow grease. Manage it as you would field bindweed.

Nutsedge

Nutsedge
Nutsedge produces lots of seed and underground tubers. (Image by Jessie Keith)

There isn’t a gardener that has not had the “pleasure” of weeding out nutsedge (Cyperus esculentus). This aggressive sedge establishes itself in the garden via copious seeds and fine, spreading roots that develop small, brown nutlet tubers. Leave just one of these tubers in the ground, and they will sprout into a whole new plant. (One side note is that the nutlets can be harvested and eaten.)

This sedge is not herbicide resistant, but its tubers are resistant. For this reason, dig out the plants rather than just pulling or spraying them. In the process, be sure to get all of the tubers. Then mulch the area over and diligently pull any small sedge sprouts as you see them.

Poison Ivy

Poison ivy
“Leaves of three let it be”…unless poison ivy is growing in your yard or garden.

Safety and knowledge are needed when removing this toxic, much-feared weed. First, it is important to realize that you can get a poison ivy rash from any “dead” portion of the plant, from stem to root, and dry plant pieces will remain toxic for years. This is because its toxic oil (urushiol) is very chemically stable and remains potent for ages. That’s why you need more than a bottle of herbicide to remove it. Careful removal by hand is surprisingly the safest method, but you have to prepare well and do it carefully.

There are several things you will need to remove poison ivy without putting yourself in danger. Body Coverings: long thick pants, a long thick shirt that covers your wrists and body, long rubber gloves, and closed-hole shoes (rubber gardening boots are perfect). Tools: a sharp spade or trowel, pruners or loppers, and hole-free plastic bags large enough to contain all plant parts.

All plant parts must be removed. For smaller plants, fully dig them up and cover them with a plastic bag. Grab them with bag and enclose them without touching them. For large vines, cut the base with pruners or loppers, and remove as much of the upper part of the vine as you can. Do not pull it for fear it may fall on you. Once again, cover and grab the plant pieces with a plastic bag to reduce contact. Then dig out the roots with a spade and bag the pieces, too. T=Secure and trash all of the bags when finished.

Cleaning Up After Poison Ivy

During the removal process, watch everything that may have come in contact with the plant (tools, clothing, gloves, trashcan lid handle, door handles, etc.) You will need to clean everything properly.

Clean up: Toss the gloves and wash all possibly contaminated tools and surfaces with a coarse cloth and soap. Degreasing spray can be very effective. Remove all contaminated clothes and washcloths and wash them in a hot water cycle with the maximum amount of a strong detergent. (If you are really worried, you can prewash them in a bucket of hot water and detergent.) Lastly, wash and shower up completely using strong soap, a textured washcloth, and lots of friction. (Friction and good, strong soap should remove all the oil from your skin. If you are really sensitive, wash twice.) Technu soap is made to remove poison ivy oil and is a good choice. [Read here for further information from the USDA about rash prevention.]

Two more essential poison ivy warnings: Poison ivy will contaminate compost, so never add it to your pile. And, if burned the toxic oils of poison ivy become airborne, causing an extra dangerous rash on the skin and in the lungs.

Mowing and chemical sprays can cut poison ivy back, but they will not remove it, or its dangers. Take the time to carefully remove your plants, and your yard will be poison ivy free in no time.