Articles

Pruning Hydrangeas

Pink big leaf hydrangeas
Prune mophead bigleaf hydrangeas in summer just after blooming.

Timing and method are essential when it comes to pruning hydrangeas, and they differ depending on the species being pruned. If done improperly, you may prune off next year’s flower buds or cause your shrubs undue stress. On the other hand, making the right cuts at the right time will help keep them looking great and flowering to perfection.

Good Pruning Technique

The right techniques and tools are key to good pruning. Here are the basics.

The Best Pruning Tools

Sharp loppers, hand pruners, and hand saws
Choose sharp loppers, hand pruners, and hand saws for easy pruning.

For small branch cuts (up to 1 cm thickness), choose a quality set of sharp bypass pruners (avoid anvil pruners, which dull quickly). Bypass pruners are easy to sharpen and long-lasting, if you choose a high-performing brand (I like Felcos). For larger branches (up to 4.5 cm thickness), choose sharp bypass loppers. More powerful pruning tools may be needed for large panicle hydrangeas that become tree-like. For larger cuts, opt for a small, sharp pull-stroke pruning saw to cut through tough branches in no time!

How to Prune

Making the right cuts to branches will facilitate good plant health. Cuts to small branches should be made 2/3 cm from the adjacent stem. Make them at 45-degree angles. Larger branches should be cut flush to the trunk collar. The collar is the ripple of bark that will slowly and protectively grow over the cut. Cuts made above the collar will not heal properly, leaving plants vulnerable to pests and disease.

How Much to Prune

A stem with a 45-degree-angle cut
Make 45-degree-angle cuts 2/3 cm from the adjacent stem. Don’t damage lower buds!

Prune to the desired height, but beware of over-pruning. Refrain from pruning over 1/3 of the top growth, especially in smaller shrubs with well-branched woody top growth. Some species, such as smooth hydrangea (Hydrangea arborescens), are clump-forming with stems that can be harshly pruned back if the clumps are well established and have become overgrown. Others, like panicle hydrangea (Hydrangea paniculata), can become tree-like and require more selective pruning.

When to Prune

Hydrangea pruning time is species-specific. Follow the following guide for the top four garden hydrangeas.

Pruning Bigleaf Hydrangeas

Purple hydrangeas
Mopheads have a rounder more formal growth habit.

Latin Name: Hydrangea macrophylla
Best Time to Prune: These hydrangeas bloom on second-year wood, so the best time to prune is in midsummer, just after they bloom. If you prune in later summer or fall, you will cut off next year’s flower heads. Deadwood is common, especially in spring. Dead or dying stems can be removed at any time of year. Old blooms can also be removed at any time, as long as you just remove the flowers and not the buds that have developed below them.

Blue big leaf hydrangeas
Pruning bigleaf hydrangea in fall will remove next year’s flower buds causing irregular flowering the following year.

How to Prune: These hydrangeas can grow too large or develop ungainly stems that have grown too high — shape plants by cutting wayward or old stems to the ground. Stems can also be trimmed to the desired height, depending on the density of the overall shrub. Refrain from shearing bigleaf hydrangeas if you want to maintain a more naturalistic, appealing appearance.
Comments: Bigleaf hydrangeas can have either lacecap (Hydrangea macrophylla var. normalis) or mophead flower clusters. Lacecaps have a looser more naturalistic horizontal growth habit and should be pruned less formally. Mopheads tend to have a rounder habit better suited to uniform pruning. In northern zones above USDA Hardiness Zone 6, these shrubs may die to the ground, so they will never flower. Protecting the crowns with Fafard Premium Natural and Organic Compost and straw can help protect their flowering stems from the winter cold.

Lacecaps
Lacecaps have a more naturalistic habit and require selective pruning.

Pruning Oakleaf Hydrangeas

Standard oak leaf hydrangeas
Standard oakleaf hydrangeas are tall, broad shrubs.

Latin Name: Hydrangea quercifolia
Best Time to Prune: Oakleaf hydrangeas also bloom on second-year wood and should be pruned just after blooming in midsummer. Once shrubs have leafed out in spring, identify and remove any dead wood from the previous year.
How to Prune: Some compact oakleaf hydrangeas have rounder, tidier habits but most reach 8-feet in height and develop a broad, naturalistic habit. Remove overgrown or crossing branches. If they overgrow an area, shrubs can be hard-pruned back by half in midsummer. Just be sure to leave plenty of green leafy branches for strong growth, and keep newly pruned shrubs irrigated through dry summer days to encourage new growth and bud set.
Comments: The pretty flower panicles of oakleaf hydrangea dry nicely and look good in winter gardens. Remove the old blooms in late winter to keep shrubs looking fresh in spring.

Dry flowerhead of oak leaf hydrangea
Keep the dry flowerheads of oakleaf hydrangea on plants for winter interest.

Pruning Panicle Hydrangeas

Panicle hydrangeas
Panicle hydrangeas are hardy and best pruned in late winter or early spring.

Latin Name: Hydrangea paniculata
Best Time to Prune: These tall, hardy hydrangeas bloom on new wood, so the best time to prune is in late winter or early spring. Remove ungainly or crossing branches and dead wood at this time. Refrain from summer pruning, and avoid removing more than 1/3 of the top growth at pruning time.
How to Prune: Panicle hydrangeas are variable shrubs that tend to be tall (8-15 feet) and bushy or tree-like, but some cultivars are compact for small-space gardens. Selectively prune bushy varieties, cutting tall branches to the trunk or base of the plant. Cut the large branches of tree-like varieties to the trunk, making sure cuts are flush to the collar.
Comments: These shrubs revive quickly from pruning. Tree-form plants may develop suckers from the base of the trunk. Keep these pruned off to maintain a single trunk. The dry blooms of panicle hydrangea also look good through winter but should be removed in spring.

Pruning Smooth Hydrangea

Incrediball™ Hydrangeas
Large-headed smooth hydrangeas, like Incrediball™, should be pruned to 1/3 height in late winter. (Image thanks to Proven Winners)

Latin Name: Hydrangea arborescens
Best Time to Prune: These easy-to-grow hydrangeas also bloom on new wood and are best pruned in late winter or early spring. They respond well to harsh pruning and can even be pruned to the ground if they outgrow a space. By late spring, they will have grown back with vigor. Refrain from summer pruning.
How to Prune: Pruned these bushy shrubs uniformly to keep their habit rounded. Large-headed varieties, like Incrediball™, are top-heavy and appreciate regular pruning to 1/3 height to keep stems shorter and sturdier. Refrain from pruning large-headed varieties to the ground.
Comments: The bushy dry flower heads look great in winter but should be removed by spring. These hydrangea root very easily from cuttings. Take any pruned branches, dip them in rooting hormone, stick them in the ground, and keep them evenly moist. They will root in no time!

Beating The Five Most Common Vegetable Garden Pests Naturally

Jessie's daughter picking Colorado potato beetles
My daughter is picking Colorado potato beetles from potato plants.

For the past 11 years, I have grown my vegetables in a community garden plot, which has provided a rough, real education in plant pests, diseases, and weeds. Why? Because these mega veggie gardens are pest hot spots, and summer is the worst time of year for the beasties.  “Bad” insects always attack my beans, cucumbers, tomatoes, and eggplants–threatening to destroy fruits and foliage, and sometimes spreading disease as they munch and crunch along. I must use every tool in the toolbox to fight them. And, if the bugs beat my crop, I often start the crop again, if there is time and the season allows. Sometimes beating pests is just a matter of retooling planting time.

The five most common vegetable garden pests that I battle in mid to late summer are Colorado potato beetles, striped cucumber beetles, eggplant flea beetles, Mexican bean beetles, and harlequin cabbage bugs. Each return year after year with regularity, but some years are worse than others. The severity of the previous winter usually indicates the severity of my pest problems–the milder the winter, the harsher the pest problem. Last winter was pretty warm, so this summer the pests are rampant. Here are some ways that I have learned to overcome them.

Colorado Potato Beetle

Colorado potato beetles
Colorado potato beetles are mating on top of a potato plant.

The surest way to attract Colorado potato beetles to your garden is to plant potatoes, but if you don’t have potatoes, they will go for your tomatoes and eggplant secondarily. (Fortunately, they don’t appear to be attracted to tomatillos.) The fat, striped adult beetles emerge from the soil in late spring to feed on emerging potatoes and then lay clusters of orange-yellow eggs on leaf undersides. They yield highly destructive little orange larvae that eat foliage nonstop and grow quickly. You can kill the insects at any stage, but it’s easiest to pick off the adults and eggs. (Click here to view the full life cycle of these beetles.) The beetles can complete up to three life cycles in a single season, so once you have them, you generally have to fight them all summer.

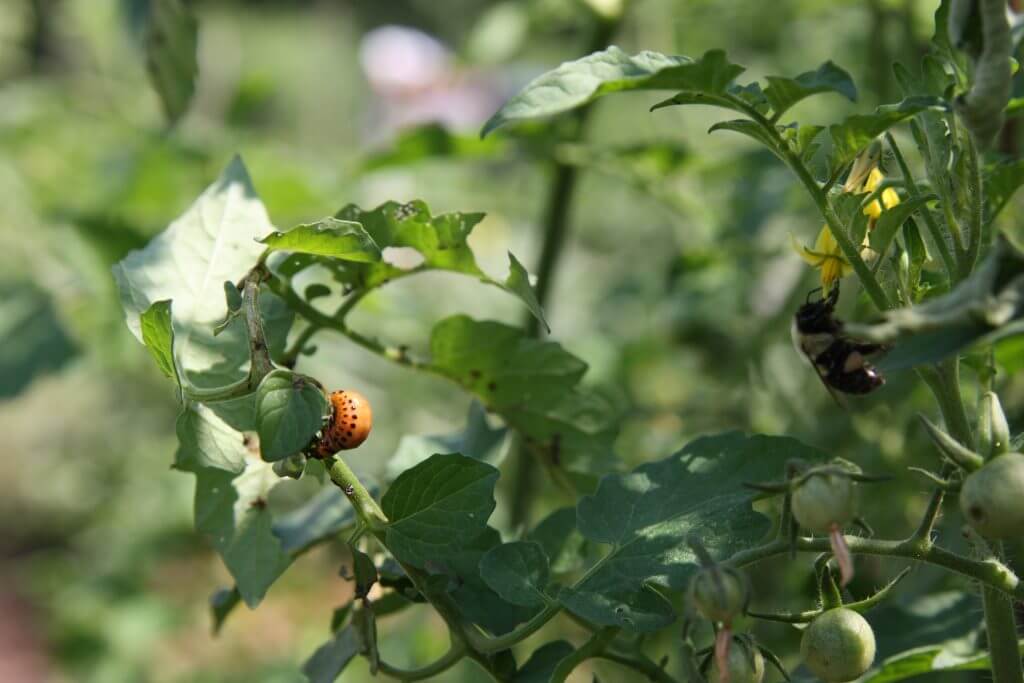
Colorado potato beetle larvae on tomato
Colorado potato beetle larvae (left) on tomato.

These insects are highly resistant to insecticides, so it pays to choose non-chemical methods of control. Time and time again, well-timed cultural control, and proper winter cleanup have proven to be the best means of battling them. Cultural control is essentially picking off the adults, eggs, and larvae and/or pruning off egg- and larval-covered leaves and branches. I generally smash picked specimens, but you can also drown them in a bucket of water. Good picking should start in mid to late spring and continue until all signs of these pests are gone.
(To learn everything there is to know about Colorado Potato Beetles, visit potatobeetle.org.)

Spotted and Striped Cucumber Beetles

Symptoms of bacterial wilt
The symptoms of bacterial wilt, which is spread by the striped cucumber beetles.

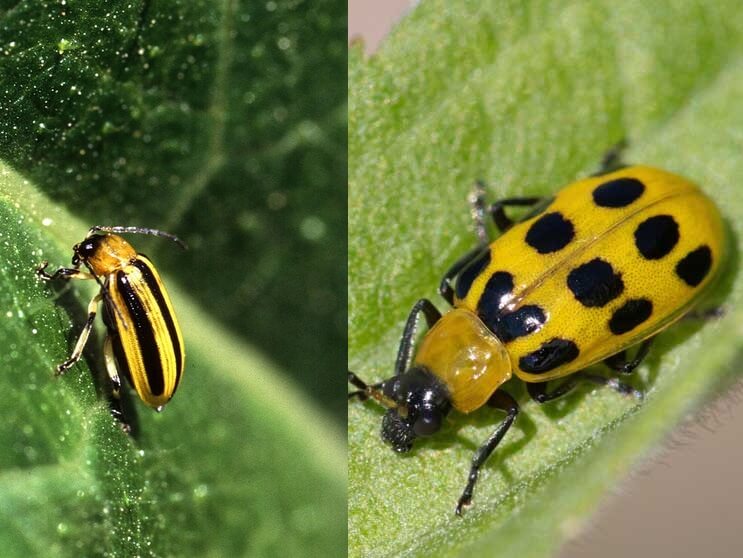
As their names suggest, striped and spotted cucumber beetles favor cucumbers, but they also attack melon vines. Small, striped or spotted cucumber beetles look so cute and innocent, but they are so destructive. Every year my cucumber crop is a crapshoot. Why? It’s not because of the damage they cause by feeding on plants and fruits. It’s the catastrophic bacterial wilt that they spread from plant to plant. Once cucumber vines get cucumber bacterial wilt, there is no turning back. The leaves will start to show droop, and eventually, whole stems will collapse, and the vine will die.

Yellow beetle

These pests may have two to three cycles in a season and are next to impossible to control, even with harsh chemical insecticides. Floating row cloth cover can keep them at bay, but it is a hassle and does not allow pollinators to reach the plants. For me, the best course of action is to choose bacterial-wilt-resistant cucumber varieties. Cornell University Extension offers a great list of resistant cucumber varieties from which to choose. Of these, I have grown the short-vined slicer ‘Salad Bush,’ which is great for container growing. Two more reliable varieties are ‘Marketmore 80‘ and ‘Dasher II.'(Click here to learn more about striped cucumber beetles.)

Eggplant Flea Beetle

Eggplant flea beetle damage on eggplant leaf
Eggplant flea beetle damage on an eggplant leaf.

Tiny jet-black eggplant flea beetles are the smallest summer pests in this list, but they can devastate an eggplant in a matter of days. The small but numerous insects leave little pockmarks all over a host plant’s leaves. Badly damaged leaves barely photosynthesize, resulting in poor, weak plants that produce puny fruits.

If you want to grow eggplant, you have to protect them from eggplant flea beetles. There are plenty of insecticides that will kill these insects, but only a few non-chemical cultural practices will stop them. The best method that I have found is protecting plants with summer weight floating row covers that transmit a lot of sunlight while physically keeping insects from the plants. The key is covering plants early and then securing the row covers at the base, so the tiny beetles cannot crawl beneath them. Holding cover edges down with bricks, pins, and even mulch or compost works. The only caveat is that you may need to hand-pollinate plants for fruit set.

Good fall cleanup of infested crop plants will also keep populations down from year to year. On average, eggplant flea beetles will complete up to four generations in a single season.
(Click here to learn more about these pests.)

Harlequin Cabbage Bug

Harlequin adult bugs on summer broccoli
Harlequin bug adults do damage to summer broccoli.

These ornamental stink bugs are the worst enemy of summer kale, broccoli, and other brassicas. They suck the juices from the leaves, causing pockmarks all over them. The most striking destruction I have ever witnessed was with enormous Portuguese kale that I had nurtured to a bold 2′ height through spring. Once the numerous beetles started to attack in early summer, the plant had no chance.

There are a few management practices that will help stop these bugs. Floating row covers can also be used, as was suggested for the eggplant flea beetles, but harlequin cabbage bugs are big enough to pick off by hand if you have the time and can handle the slightly stinky smell they emit when disturbed. Small nymphs are also susceptible to treatment with OMRI Listed® insecticidal soap.

Two to three generations of harlequin cabbage bugs can occur each season. By late summer, they are no longer a problem so that you can plant your fall cabbages and kales with confidence.
(Click here to learn more about these pests.)

Mexican Bean Beetle

Mexican bean beetle larvae on bean leaf
Mexican bean beetle larvae and their damage on a bean leaf.

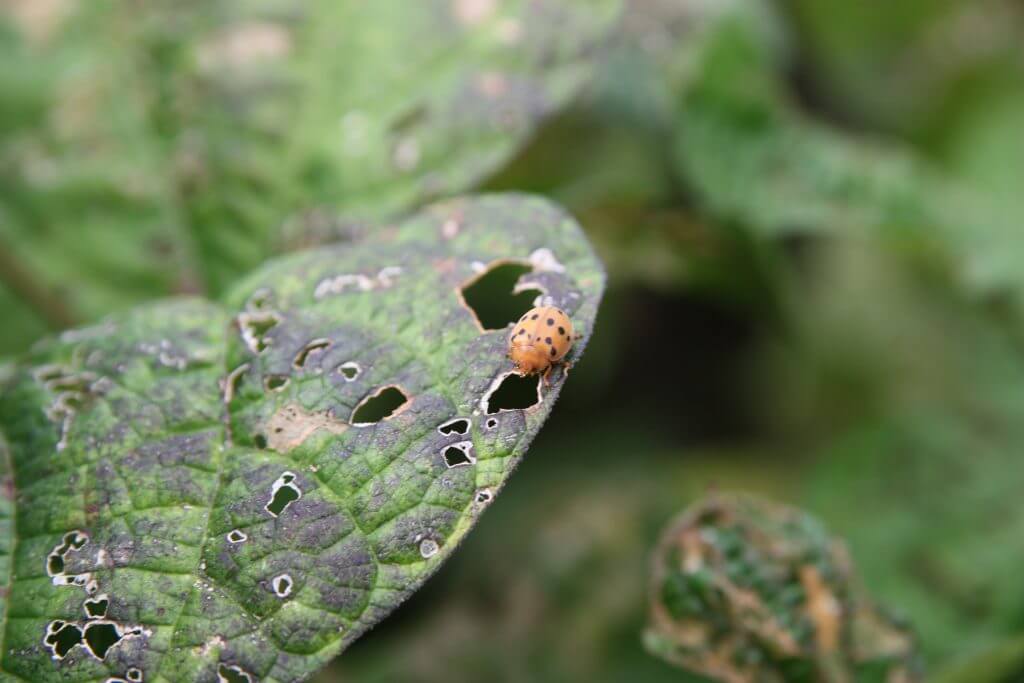
Like Colorado potato beetles, it’s the larvae of Mexican bean beetles that do the harshest damage to bean plants. The adults emerge in late spring, but they rarely cause major problems on bean plants until midsummer. The adults are orange, black-spotted beetles that lay clusters of orange-yellow eggs below the leaves, much like the Colorado potato beetle. The unusual larvae are fuzzy, bright yellow, and devastate leaves as they feed along the leaf bottoms.

Beetle on damaged leaf

Tou can control these pests as you would Colorado potato beetles with one exception – destructive harvesting. Destructive harvesting is the harvest and total removal of infested plants from the garden. After picking, infested plants should be pulled, bagged, and taken far from your garden. (Click here to view a YouTube video from the University of Maryland about destructive harvesting.) Beans can be replanted as late as mid-August for early fall harvest.

In general, regular weeding, good plant care, and excellent garden clean up, in summer and fall, will help keep pest populations down. Clean the ground of all leaf litter and weeds, and amend the soil with top-quality amendments for vegetables, such as Fafard® Garden Manure Blend or Natural & Organic Compost, and your plants will be more robust to resist the many garden pests that threaten to destroy them.